After launching a great selection of smartwatches and TWS earbuds this year, wearables manufacturer Mobvoi is now working on a new audio recorder product. The device, called Mobvoi AI Recorder, was recently spotted in an FCC filing, which gives us a good look at its design and dimensions.
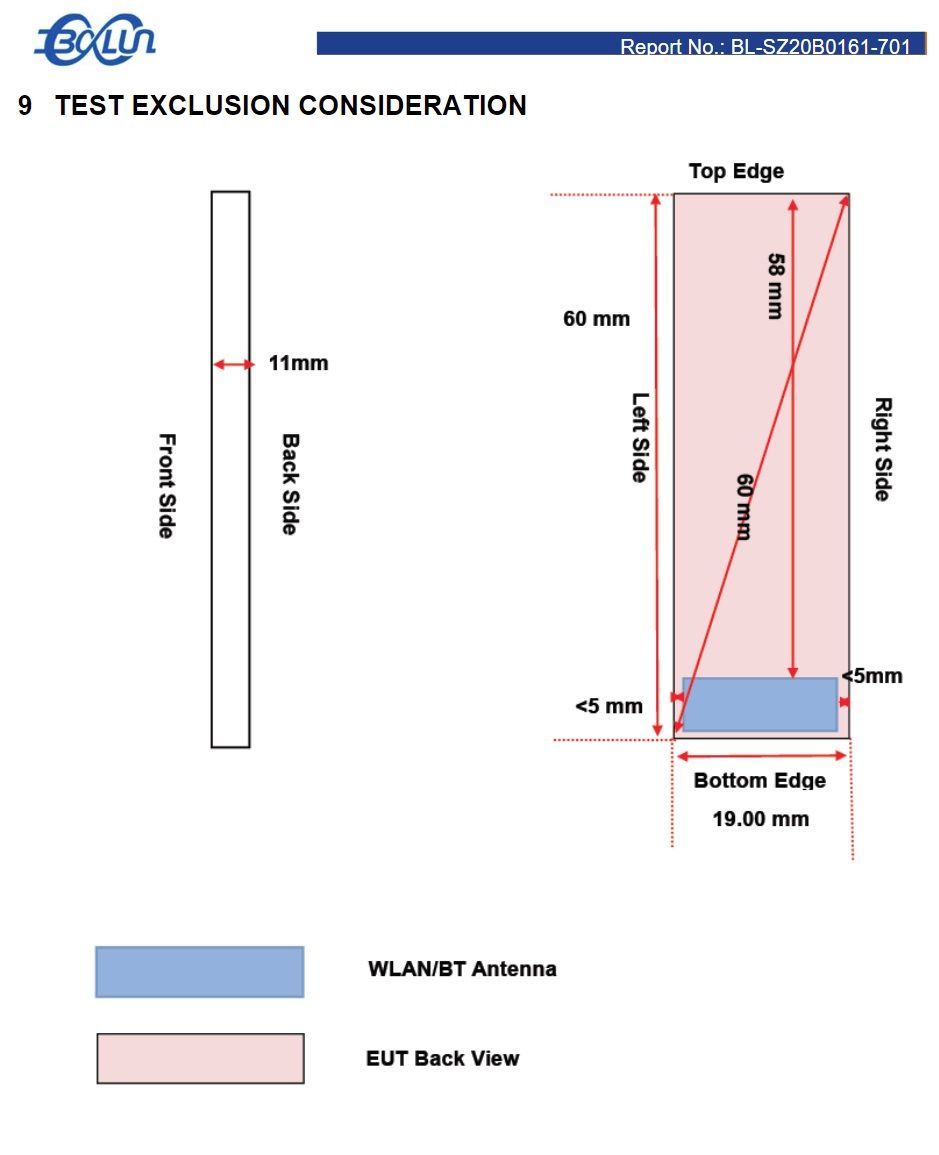
The FCC filing in question was submitted by Shenzhen Tinnotech Technology Limited, which is most likely the ODM for the device. As per the filing, the Mobvoi AI Recorder will have a tall rectangular body with rounded edges. The recorder will feature two buttons on the left edge and a belt clip on the back. It will measure just 11mm thick, 60mm tall, and 19mm wide.


While the FCC filing reveals no further information about the device, we managed to unearth some additional details by decoding the latest version of the Mobvoi app on Google Play. The teardown revealed a tutorial page that explains what the various buttons do on the device and how it works. We also managed to extract a few high-quality renders of the device from the APK.
New strings found in the Mobvoi app
<string name="ticrecorder">Mobvoi AI Recorder</string>
<string name="triton_battery_unknown">request…</string>
<string name="triton_blue_light_long_press">Long press Bluetooth until green indicator flickers</string>
<string name="triton_bluetooth_connect">Bluetooth connection</string>
<string name="triton_bluetooth_pair_text">Bluetooth pairing</string>
<string name="triton_confirm_to_finish">Press the boot button again to complete the pairing</string>
<string name="triton_connected">Connected</string>
<string name="triton_data_sync">Data transporting…</string>
<string name="triton_delete">Delete</string>
<string name="triton_deleting_file">File deleting…</string>
<string name="triton_device_number">Device number:%s</string>
<string name="triton_device_sync">Sync</string>
<string name="triton_device_title">Triton会议盒子</string>
<string name="triton_disconnected">Disconnected</string>
<string name="triton_edit_hint">输入搜索词搜索相关内容</string>
<string name="triton_fail_upload_to_server">Upload fail.</string>
<string name="triton_file_already_synced">File already synchronized</string>
<string name="triton_file_delete">Delete</string>
<string name="triton_file_issync">synchronized</string>
<string name="triton_file_sync">Upload to the cloud</string>
<string name="triton_file_syncing">Synchronizing…</string>
<string name="triton_file_upload">Transfer to the phone</string>
<string name="triton_file_uploading">Uploading…</string>
<string name="triton_find">Search again</string>
<string name="triton_find_device">Discovery equipment</string>
<string name="triton_find_my_device">Find my device</string>
<string name="triton_finish_wifi_transport">Synchronizing succeeded</string>
<string name="triton_how_to_des">"1. Click the Bluetooth button on the device, and the Bluetooth light is green, indicating that the Bluetooth connection is on.
2.If the device has been connected to the phone Bluetooth before, the device will automatically detect that the Bluetooth is on and make the connection automatically"</string>
<string name="triton_how_to_open">How to turn on/off</string>
<string name="triton_how_to_wifi">"1. After the device Bluetooth is connected to the mobile phone, click the WiFi button, and the WiFi light is blue, indicating that the WiFi express has been turned on.
2.APP automatically detects WiFi, and automatically connects After
3.APP connects to the device, click below to enter the recording pen folder for data synchronization."</string>
<string name="triton_i_known">I known</string>
<string name="triton_make_sure_bluetooth_on">"Please make sure your device is powered on and your phone's Bluetooth is turned on."</string>
<string name="triton_memory_manager">Space management</string>
<string name="triton_more">more</string>
<string name="triton_my_device">My Device</string>
<string name="triton_no_server_file">No files</string>
<string name="triton_no_unsynced_file">No files</string>
<string name="triton_not_device">No available equipment found.</string>
<string name="triton_not_transfer">Unsynchronized recording</string>
<string name="triton_operation_guide">Operating instructions</string>
<string name="triton_pair_fail">Bind failed.</string>
<string name="triton_pair_success">Bind succeeded.</string>
<string name="triton_record_duration">%1$dm%2$ds</string>
<string name="triton_record_duration_with_hour">%1$dh%2$dm%3$dm</string>
<string name="triton_record_file_name">The recording on %3$s,%1$d/%2$d</string>
<string name="triton_record_list">Record List</string>
<string name="triton_record_list_synced">Synchronized recording list in the cloud</string>
<string name="triton_remain_duration">It is expected that it can also be transcribed: %1$s</string>
<string name="triton_remain_memory">Remaining: %1$s</string>
<string name="triton_serial_number">SN: %1$s</string>
<string name="triton_source_cloud">in cloud</string>
<string name="triton_source_device">in the device</string>
<string name="triton_storage_management">Space management</string>
<string name="triton_success_delete_file">Delete file succeeded.</string>
<string name="triton_success_upload_to_server">Upload succeeded.</string>
<string name="triton_sync_by_wifi">Audio data volume is large, WiFi transmission is recommended</string>
<string name="triton_transport_left_time">Please be patient and wait approximately %1$d minutes %2$d seconds.</string>
<string name="triton_tutorial_page1_1">Record key</string>
<string name="triton_tutorial_page1_2">On/WiFi fast transfer key</string>
<string name="triton_tutorial_page1_3">Microphone</string>
<string name="triton_tutorial_page1_title">Equipment composition description</string>
<string name="triton_tutorial_page2_1">Magnetic back clip</string>
<string name="triton_tutorial_page2_2">USB - C</string>
<string name="triton_tutorial_page2_3">USB Type - C data line</string>
<string name="triton_tutorial_page2_title">Equipment composition description</string>
<string name="triton_tutorial_page3_1">Long press Bluetooth until green indicator flickers</string>
<string name="triton_tutorial_page3_2">1. Power on, start button is on in green, APP will detect device Bluetooth automatically for connection.</string>
<string name="triton_tutorial_page3_3">2. If device has been connected to mobile phone Bluetooth, the device will have automatic connection when detect that Bluetooth is enabled.</string>
<string name="triton_tutorial_page3_title">Bluetooth pairing and APP connection</string>
<string name="triton_tutorial_page4_1">1. Power on, click “Record” and it will shake; recording is started when red indicator flickers.</string>
<string name="triton_tutorial_page4_2">2. Click “Record” key again to shake, red indicator is off and recording is stopped.</string>
<string name="triton_tutorial_page4_title">Start/stop recording</string>
<string name="triton_tutorial_page5_1">Turn on WiFi fast transfer to speed up transfer of record into mobile phone APP</string>
<string name="triton_tutorial_page5_2">1. When Bluetooth is connected to mobile phone, click WiFi button again, WiFi blue indicator is on, which means WiFi fast transfer is enabled</string>
<string name="triton_tutorial_page5_3">2. The APP will detect WiFi automatically for automatic connection</string>
<string name="triton_tutorial_page5_4">3. When APP is connected, enter the device’s folder for data synchronization</string>
<string name="triton_tutorial_page5_title">WiFi fast transfer</string>
<string name="triton_tutorial_page6_1">Record Button</string>
<string name="triton_tutorial_page6_10">BLUE is on</string>
<string name="triton_tutorial_page6_10_1">Wifi enabled</string>
<string name="triton_tutorial_page6_11">BLUE flashing</string>
<string name="triton_tutorial_page6_11_1">Waiting for connection</string>
<string name="triton_tutorial_page6_12">BLUE always on</string>
<string name="triton_tutorial_page6_12_1">Wifi connected</string>
<string name="triton_tutorial_page6_13">YELLOW flashing</string>
<string name="triton_tutorial_page6_13_1">OTA upgrade</string>
<string name="triton_tutorial_page6_14">RED always on</string>
<string name="triton_tutorial_page6_14_1">Charging</string>
<string name="triton_tutorial_page6_15">BLUE always on</string>
<string name="triton_tutorial_page6_15_1">Fully charged</string>
<string name="triton_tutorial_page6_2">RED flashing</string>
<string name="triton_tutorial_page6_2_1">Recording</string>
<string name="triton_tutorial_page6_3">RED off</string>
<string name="triton_tutorial_page6_3_1">End of recording</string>
<string name="triton_tutorial_page6_4">WiFi Button</string>
<string name="triton_tutorial_page6_5">Green is on</string>
<string name="triton_tutorial_page6_5_1">Power on</string>
<string name="triton_tutorial_page6_6">Green flashing</string>
<string name="triton_tutorial_page6_6_1">Waiting for connection</string>
<string name="triton_tutorial_page6_7">Green always on</string>
<string name="triton_tutorial_page6_7_1">Bluetooth connected</string>
<string name="triton_tutorial_page6_8">RED is off</string>
<string name="triton_tutorial_page6_8_1">Power off</string>
<string name="triton_tutorial_page6_9">RED flashing</string>
<string name="triton_tutorial_page6_9_1">Insufficient power supply</string>
<string name="triton_tutorial_page6_title">Indicator light</string>
<string name="triton_tutorial_page7_1">rec.mobvoi.com</string>
<string name="triton_tutorial_page7_2">You can log on to the recording platform of Mobvoi and then edit and rewrite the recording files online.</string>
<string name="triton_tutorial_page7_title">Log in to WEB for online editing</string>
<string name="triton_tv_update_content">Updates</string>
<string name="triton_unbind_device">Unbind Device</string>
<string name="triton_unbind_fail">Unbinding failed.</string>
<string name="triton_update">Firmware upgrade</string>
<string name="triton_usb">USB data transport</string>
<string name="triton_version">Firmware version</string>
<string name="triton_week_fri">Fri</string>
<string name="triton_week_mon">Mon</string>
<string name="triton_week_sat">Sat</string>
<string name="triton_week_sun">Sun</string>
<string name="triton_week_thu">Thu</string>
<string name="triton_week_tue">Tue</string>
<string name="triton_week_wed">Wed</string>
<string name="triton_wifi">WiFi配网</string>
<string name="triton_wifi_connect">WiFi connection being initiated</string>
<string name="triton_wifi_connect_fail">Wifi connect fail.</string>
<string name="triton_wifi_disconnected">Wifi disconnected</string>
<string name="triton_wifi_fast">WiFi Fast Forward</string>
<string name="triton_wifi_file_sync">File synchronize</string>
<string name="triton_wifi_transport">Wifi Synchronize</string>
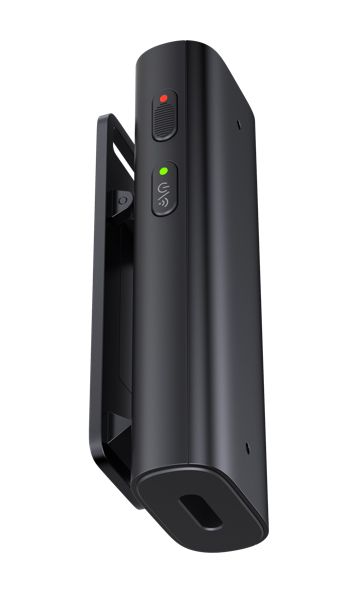
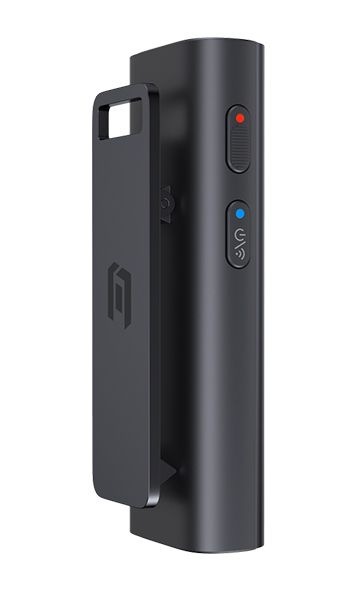
As you can see in the attached images, the Mobvoi AI Recorder will feature two microphones on the front face, with a record button and power switch/WiFi fast transfer key on the left edge. As seen in the FCC filing, the recorder will have a magnetic belt clip on the back, and it will also feature a USB Type-C port on the bottom edge.


The tutorial further reveals that users will be able to pair the Mobvoi AI Recorder with their smartphones by pressing the power button, which will show a green LED when the device is in pairing mode. After the initial pairing process is complete, the device will automatically connect to the smartphone every time it’s turned on.


To record audio, users will have to press the record button, and the Mobvoi AI Recorder will vibrate to indicate that it has started recording. The record button will also show a red LED indicator when the recording is in process. Users will be able to quickly transfer their recording to a connected device by pressing the power/WiFi fast transfer button when it’s connected to a smartphone. The indicator LED will then turn blue to indicate that WiFi fast transfer is enabled.


The Mobvoi app will automatically detect when WiFi fast transfer is turned on, and it will open up the device’s root folder on your smartphone for data synchronization. The tutorial also includes a handy chart highlighting all the LED indicator colors and their meaning. Now that we’ve taken a look at the tutorial, here are a couple of high-resolution renders of the device:

Although Mobvoi hasn’t officially released any information about the Mobvoi AI Recorder so far, the company has set up a new website that talks about an AI transcription service designed to help users manage and transcribe their recordings. As you can see in the attached screenshots, the website highlights the capabilities of the Mobvoi AI for Transcription that will allow users to convert their voice recordings into text files easily.

The AI will also mark key audio to help users jump back to important portions of their recording with the tap of a button. Furthermore, it will provide a smart summary with all important contents displayed in segments. Each segment will have its own corresponding keywords that will allow users to locate and trace the content of previous meetings quickly.

The company’s editing suite will also let users add tags to their recordings for easier access, edit transcriptions on the fly, and view all recordings across various platforms. Finally, to ensure that all user data remains private, Mobvoi will encrypt all data uploaded to its service using multiple encryption algorithms.

As of now, we have no information regarding the launch date and pricing for the Mobvoi AI Recorder. We reached out to Mobvoi to get further details on the upcoming product, but the company refused to comment on our findings.
The post Mobvoi is working on a smart audio recorder and an AI transcription service appeared first on xda-developers.
from xda-developers https://ift.tt/3hu3ZSS
via
IFTTT