LightBlog

lundi 17 août 2020

MediaTek unveils the Dimensity 800U, another mid-range 5G chip for smartphones

MediaTek has just announced the Dimensity 800U, a new mid-range chipset in the company’s Dimensity 800 series. This is the company’s sixth system-on-a-chip with an integrated 5G modem and the sixth chip in the Dimensity series overall.

The Dimensity 800U joins the Dimensity 720Dimensity 800Dimensity 820Dimensity 1000, and Dimensity 1000+ in MediaTek’s lineup of Dimensity SoCs with integrated 5G modems.

Here are some of the key features of the new MediaTek Dimensity 800U:

  • It’s fabricated on a 7nm manufacturing process (TSMC’s 7nm FinFET).
  • It has an octa-core CPU comprised of 2 ARM Cortex-A76 CPU cores clocked at up to 2.4GHz and 6 ARM Cortex-A55 CPU cores clocked at up to 2.0GHz.
  • It features ARM’s Mali-G57 GPU, an independent AI processing unit (APU), supports LPDDR4X RAM (up to 2133MHz), and supports UFS 2.1-class storage.
  • It supports displays at up to Full HD+ resolution and 120Hz refresh rates. MediaTek also says it supports HDR10+ video as well as MediaTek’s custom MiraVision PQ engine with additional HDR optimizations for videos.
  • Its ISP supports up to 64MP image sensors as well as quad camera configurations.
  • It has support for voice on wakeup (VoW), multiple trigger words and voice assistant services, and dual-mic noise reduction technology.
  • Lastly, it has an integrated 5G modem with support for 5G+5G Dual Sim Dual Standby (DSDS), sub-6GHz 5G on SA and NSA networks, dual Voice over New Radio (VoNR), 5G two carrier aggregation (2CC 5G-CA), and MediaTek’s 5G UltraSave technology.

The Dimensity 800 has 4 ARM Cortex-A76 CPU cores clocked at up to 2.0GHz and 4 ARM Cortex-A55 CPU cores clocked at up to 2.0GHz, while the Dimensity 820 has 4 ARM Cortex-A76 CPU cores clocked at up to 2.6GHz and 4 ARM Cortex-A55 CPU cores clocked at up to 2.0GHz. Therefore, the new Dimensity 800U will likely have better single-core performance than the Dimensity 800 but not the Dimensity 820, but it will have worse multi-core performance than both the Dimensity 800 and the Dimensity 820. The Dimensity 800 and Dimensity 820 also have an ARM Mali-G57 GPU like the new 800U, with the 800’s Mali-G57 GPU having 4 cores and the 820’s Mali-G57 GPU having 5 cores. According to MediaTek, the Dimensity 800U features up to 11% faster CPU performance and 28% faster GPU performance compared to the Dimensity 720, which itself has an ARM Mali-G57MC3.

Outside of China, there hasn’t been a single smartphone to launch with a MediaTek Dimensity chipset, although the company recently confirmed that devices with the chipsets will launch outside of China in Q3 2020.

MediaTek Dimensity 800U infographic

An infographic summarizing the key features of the new MediaTek Dimensity 800U. Source: MediaTek.

The post MediaTek unveils the Dimensity 800U, another mid-range 5G chip for smartphones appeared first on xda-developers.


from xda-developers https://ift.tt/34acxcQ
via IFTTT

Microsoft adds a cursor control gesture to the latest SwiftKey beta on Android

The Microsoft-owned SwiftKey keyboard app for Android has served users well with its fast, accurate typing experience, emoji predictions, and multiple language support. But one thing that’s always been missing is cursor control, which has finally appeared in the latest beta release.

First discovered by AndroidPolice’s Artem Russakovskii, the new feature makes it much easier to edit text in SwiftKey by letting you precisely move the position of the cursor. The new feature is first executed by tapping and holding on the space bar, as shown in the tweet below. Once the keyboard enters its cursor control mode (which happens when the keys are grayed out and the “Drag finger to move cursor” text appears in the text suggestion area), you can drag anywhere and in any direction on the keyboard to move the cursor. According to Russakovskii, the new feature works well with SwiftKey’s language selector.

This is the type of quality of life improvement that makes using SwiftKey on Android that much better. While the gesture is new to SwiftKey, a similar gesture has been available in Google’s Gboard app for a while. Although, Gboard’s implementation is more limiting as users can only swipe horizontally on the keyboard’s spacebar to move the cursor left or right.

As of now, cursor support is only available in the latest SwiftKey beta for Android, but considering it’s something users have been requesting for a while, chances are it’ll roll out more widely sooner rather than later. You can download the latest beta release from the Google Play Store listing embedded below. There’s no need to enroll in a beta program or wait for a server-side update as the feature seems to be available for anyone downloading the app. It’s also available to users of the iOS app since January, apparently.

Microsoft SwiftKey Beta (Free, Google Play) →

The post Microsoft adds a cursor control gesture to the latest SwiftKey beta on Android appeared first on xda-developers.


from xda-developers https://ift.tt/32fIY7p
via IFTTT

The Galaxy Note 20 doesn’t ship with AKG earbuds in the US, but you can ask for them

It looks like a new trend in late 2020 is to ship phones with less stuff in the box. The Apple iPhone 12 is rumored to ship without a charger or wired earbuds in the box, and rumors also point to Samsung considering ditching the charger in the box of a future Galaxy smartphone. We haven’t heard rumors of Samsung ditching wired earbuds in the box just yet, which would be a marked departure from the current norm as Samsung Galaxy flagships typically come with high-quality wired earbuds tuned by AKG. However, Samsung’s new Galaxy Note 20 series, comprised of the Galaxy Note 20 and Note 20 Ultra, don’t come with AKG earbuds in North America.

Samsung Galaxy Note 20 Forums ||| Samsung Galaxy Note 20 Ultra Forums

Fortunately, it seems that Samsung is more than happy to ship a pair of AKG earbuds to you if you just ask for them, according to PCWorld. All you have to do is contact Samsung support and provide them with proof of purchase for them to ship a pair of the USB-C earbuds your way, apparently free of charge. This offer only applies for Galaxy Note 20 devices sold in North America as these are the only Samsung Galaxy Note phones so far to not come with earbuds in the box. These USB-C earbuds retail for $29.99 on Samsung’s website and feature silicone tips, a built-in DAC, 2-way speakers, AKG tuning, and 3-button controls.

Samsung AKG earbuds

So if they are free anyway, then why is Samsung not including them in the box with the Galaxy Note 20 or Note 20 Ultra in North America? The company says that customers of flagship smartphones in North America generally opt for Bluetooth earbuds anyway, so they removed the wired earbuds from the box since their usage has steadily declined.

Moving forward, wired earbuds likely won’t be bundled in the box with future Samsung Galaxy flagships, either. But if you really need them, you can still get them for free. Just be prepared to wait a bit for them to be shipped later on.

The post The Galaxy Note 20 doesn’t ship with AKG earbuds in the US, but you can ask for them appeared first on xda-developers.


from xda-developers https://ift.tt/3ayTPgc
via IFTTT

ASUS ZenFone 7 series launches next week on August 26th

Last year, ASUS launched the ZenFone 6, a flagship smartphone practically aimed at the Reddit and XDA crowd. It features the Qualcomm Snapdragon 855, a 3.5mm headphone jack, a rear-mounted fingerprint scanner, no notch or hole-punch thanks to a flip camera with a motorized swivel, a 5,000mAh battery, a wide-angle camera, and a clean version of Android in the form of ZenUI 6. Over a year later, ASUS is now preparing to launch the successor to the ZenFone 6, which will aptly be called the ZenFone 7. ASUS this week quietly put up a YouTube live stream event for the launch that will happen on August 26th.

What’s worth noting about this live stream event is that it’s for the Zenfone 7 Series, suggesting there will be more than one model announced this year.

As Android Authority points out, a database listing may have already spoiled a few of the ASUS Zenfone 7’s specs, including a 5,000mAh battery and 30W charging. Qualcomm already confirmed the ZenFone 7 will feature the Snapdragon 865, though it’s unclear if it’ll have the regular or the Plus variant. Other specs like the screen size, display technology, and camera may follow the trends of 2020. We don’t know what spec differences, if any, there will be between the device(s) in the new smartphone series.

What we also don’t know is how much the device will cost, which could be hefty given the high prices of other flagship smartphones we’ve seen this year. Last year’s Zenfone 6 was priced at $499, which was right in the ballpark of affordable, value-flagship smartphones at the time. 5G has made many flagships more expensive this year, so we’re hoping the ZenFone 7 doesn’t fall victim to this trend.

If you’re interested to learn more, the Zenfone 7 Series will be unveiled to the world on August 26 at 2:00 PM in Taipei (2:00 AM Eastern Time), so set a reminder on your calendar.

The post ASUS ZenFone 7 series launches next week on August 26th appeared first on xda-developers.


from xda-developers https://ift.tt/2CAzhrf
via IFTTT

Google Chrome 86 will warn users about filling out insecure forms on HTTPS pages

When Google rolls out Chrome 86 in October, the web browser will warn people when they try to complete forms that are submitted insecurely on otherwise secure (HTTPS) pages. According to Google, the new warning is meant to provide users with a more secure browsing experience, as submitting information on insecure forms could potentially reveal private information to eavesdroppers.

Google says that Chrome 86 will introduce the following changes:

  • Autofill will be disabled on mixed forms, but Chrome’s password manager will continue to work. That’s because the password manager is designed to help users input unique passwords and is thus safe to use even on forms that are submitted insecurely. It’s better to allow users to use the password manager than to have them reuse old passwords.
  • When a user starts filling out a mixed form, they will see text warning them that the form is not secure.
  • If a user tries to submit a mixed form, they will see a full-page warning that alerts them of the potential risk with a confirmation if they’d like to submit the form anyway.

In the past, Chrome would remove the lock icon from the address bar when a mixed form was used. Google said this experience was confusing to the end-user as it did not properly inform users of the risks associated with submitting data in insecure forms, which is why it’s making the change.

Today’s announcement is the latest in Google’s efforts to end the use of HTTP content on the web. Back in July of 2018, Google Chrome began labeling all HTTP sites as “not secure.” The browser also blocks mixed downloads and other insecure content from loading on HTTPS pages. Blocking mixed forms is a logical progression, so web developers should have seen this change coming. For those who want to fully migrate forms on their site to HTTPS, Google offers tips to help with the transition.

The post Google Chrome 86 will warn users about filling out insecure forms on HTTPS pages appeared first on xda-developers.


from xda-developers https://ift.tt/3aJPmaR
via IFTTT

Google Chrome tests a “Fast page” label to denote websites that meet Core Web Vitals metrics

Over the past several months, Google has been rolling out Chrome developer tools to reduce page load times, enable secure browsing, and build native app-like experiences. Now, the company is introducing a feature that will highlight high-quality user experiences on the web. Starting with Chrome 85 beta for Android, Google will label links in the context menu that lead to a “fast page”. When a web page is labeled as fast, it means users navigating to it have historically had a “particularly good experience.”

Google says that historical data from a site’s URLs with similar structures are aggregated together when labeling. This historical data is evaluated on a host-by-host basis when the data collected regarding the URL is insufficient to assess speed or is not yet unavailable, such as when the URL is new or unpopular.

The new feature is part of Google’s Web Vitals initiative, which “measure[s] dimensions of web usability such as loading time, responsiveness, and the stability of content as it loads, and define[s] thresholds for these metrics to set a bar for providing a good user experience.” According to Google, when developers make changes to make web pages load quicker, websites will see usability improvements and increased engagement.

Although Google plans to “maintain alignment with Core Web Vitals as they evolve,” the company says developers should expect that “the definitions and thresholds of the Core Web Vitals to be stable” and recognizes that optimizing for the initiative requires investment. To that end, the company has updated its developer tools such as Lighthouse, DevTools, PageSpeed Insights, and Search Console to surface information and recommendations.

As of now, fast page labeling is being rolled out to Chrome 85 beta, but you can manually turn it on by going to “chrome://flags” and enabling “Context menu performance info and remote hint fetching.” Once this feature rolls out, users will see labels when they’re on Lite mode or if they have the “Make Searches and Browsing Better” option turned on.

In addition to labeling web pages as fast, Google earlier this year said it will start to rank websites based on “page experience” as soon as next year. If the search giant perceives that people don’t enjoy using a website, it will not rank as high in Search results.

The post Google Chrome tests a “Fast page” label to denote websites that meet Core Web Vitals metrics appeared first on xda-developers.


from xda-developers https://ift.tt/314jWbN
via IFTTT

Android App Basics: How to install Android Studio on Windows, macOS, Linux, and Chrome OS

If you’re just getting started in Android app development, you may or may not know of Android Studio. It’s Google’s official IDE (integrated development environment) made specifically for developing native Android apps. For Java or Kotlin Android apps, there’s no better option in terms of ease of development.

Of course, Android Studio is a development tool, so it’s not exactly a plug-and-play installation for your preferred development platform. There’s a little manual setup required, and that’s where this article comes in. Today, we’re going to go through installing and setting up Android Studio on Windows, macOS, Linux, and Chrome OS. Let’s get started!


Download Android Studio

This may be the most obvious step, but I’m including it here anyway for easy access. Before you can actually use Android Studio, you’ll need to download the appropriate version for your system. Follow the link below and download the appropriate file for your device.

Android Studio Downloads


Install Android Studio

Now comes the fun part. Follow the section below for your operating system to get Android Studio installed.

Windows

Windows actually has a couple of ways to install it.

Method 1

If you just want an easy installation, you can download and run the installer EXE. You’ll be guided through installing Android Studio, and then you’re done!

Just download the EXE and run it.

Method 2

This method is a bit more involved, but if you don’t have administrator access on your computer, this is the better choice. Let’s start.

  1. The first thing to do is to download Android Studio. Grab the ZIP version for Windows.

    Download the ZIP for Windows.

  2. While that’s downloading, make a folder for where you want to store Android Studio. For instance, my installation is located at E:\AndroidStudioDevWin\.
  3. Next, open up the ZIP you downloaded. Inside, you should see a folder called android-studio. Go into that folder and you should see a whole bunch of folders and files, including binjre, and uninstall.exe. These are the files you’re going to extract.

    You should see something similar to this.

  4. Open a new File Explorer window and navigate inside of the folder you created in step 2. In my case, that’s E:\AndroidStudioDevWin\.
  5. Back in the ZIP window, select all the folders and files and drag them to the window you opened in step 4.
    Android Studio on Windows

    Extract the files into the folder you created for Android Studio.

  6. Once the extraction is complete, you can delete the ZIP if you want.
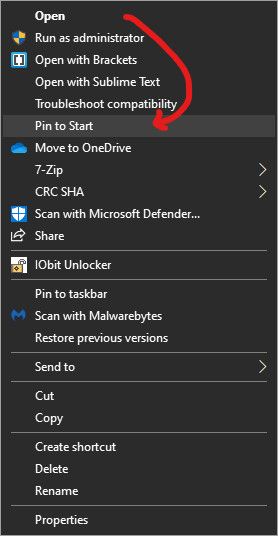
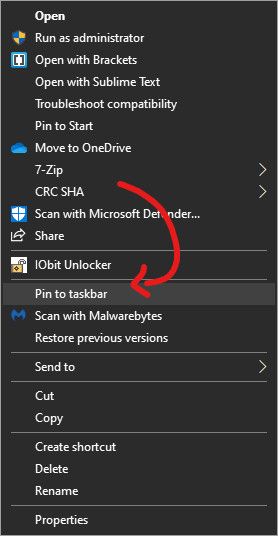
  7. Now, go into the bin directory and find the studio64.exe file. Right-click and choose the Pin to taskbar option. Right-click again and choose the Pin to start option.
    Android Studio on Windows Android Studio on Windows

And that’s it! You should be able to search for “studio” in the Start Menu or simply click on the Android Studio icon in the taskbar to run it.

macOS

Follow these steps to install Android Studio on macOS:

  1. Download the Android Studio DMG for Mac.

    Download the DMG for Mac.

  2. Open the downloaded DMG. A window with the Android Studio icon and a shortcut to the Applications folder should open. If you’ve installed third-party apps on macOS before, this should look pretty familiar.

    You should see something like this when you open the DMG.

  3. Drag the icon to the Applications folder shortcut and let it copy.

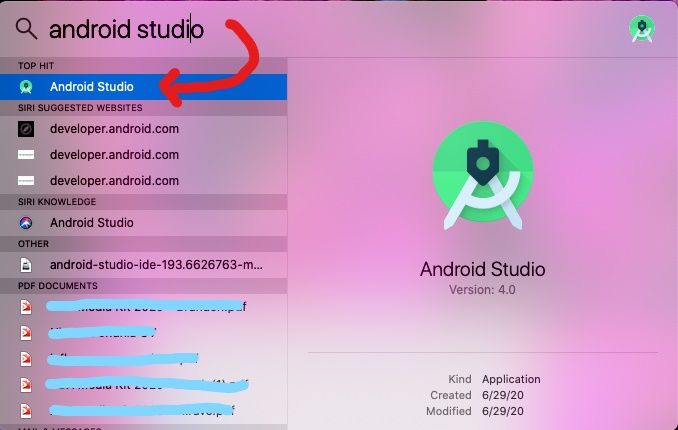
Once the copying has finished, you can open Android Studio by searching for it in Spotlight (CMD+Space) or Launchpad (Fn+F4).
Android Studio on macOS Android Studio on macOS

Linux

There are quite a few Linux distributions out there, and these instructions can’t cover them all. We’re going to be talking specifically about Debian-based and Fedora-based distributions here, but the general instructions should apply to all distributions.

  1. First up, you’ll need to download the Android Studio TAR.GZ for Linux.

    Download the TAR.GZ for Linux.

  2. The second thing you’ll need to do is create a directory where it should be installed. For instance, it could be at /home/zachary/Desktop/AndroidStudio/.
  3. Next, open up the TAR.GZ archive you downloaded. You should see a folder called android-studio. Go into that folder and you should see a whole bunch of folders and files, including binjre, and product-info.json.

    You should see a bunch of files in the ZIP, like this.

  4. Open a new Files window and navigate into the folder you created in step 2. In my case, it’s /home/zachary/Desktop/AndroidStudio/.
  5. Back in the Archive Manager window, select all the folders and files and drag them into the window you opened in step 4. Once the extraction is complete, you can delete the TAR.GZ if you want.
  6. While the files are copying, open a terminal (Ctrl+Alt+T). We need to make sure some libraries are installed so Android Studio can run.
    1. On Debian-based distributions, run:
      sudo apt-get install libc6:i386 libncurses5:i386 libstdc++6:i386 lib32z1 libbz2-1.0:i386
    2. On Fedora-based distributions, run:
      sudo yum install zlib.i686 ncurses-libs.i686 bzip2-libs.i686
    3. On other distributions, you’ll need to find and install these libraries using the appropriate package manager.
  7. Once the extraction is finished, go into the bin directory in your installation directory. Inside, you should see a file named studio.sh.
  8. Right-click on an empty space in the window and choose the Open in Terminal option.

    Choose “Open in Terminal”

  9. Once the terminal window opens, run the following command:
    ./studio.sh

    This will open Android Studio.

Now you’ve got Android Studio installed! If you want to make it easier to open, you can try making a desktop entry. Follow the instructions below to do so.

  1. Right-click on your desktop and choose Open in Terminal.

    Choose “Open in Terminal”

  2. In the terminal window, run:
    touch AndroidStudio.desktop

    Close the terminal.

  3. Open the AndroidStudio.desktop file in a text editor, like Gedit, and paste the following:
    [Desktop Entry]
    Name=Android Studio
    Exec=/home/zachary/Desktop/AndroidStudio/bin/studio.sh
    Icon=/home/zachary/Desktop/AndroidStudio/bin/studio.sh
    Type=Application
    Terminal=False
    Categories=Utility;
  4. You’ll need to change the paths after Exec= and Icon= to match your paths.

    Your desktop entry should look something like this.

  5. Save, and then right-click AndroidStudio.desktop. Choose the Allow Launching option. This may not be necessary for all distributions.
    Install Android Studio on Linux

    Select the “Allow Launching” option.

  6. Finally, double-click the file to launch Android Studio.

Chrome OS

If you’re on Chrome OS or some variant of Chromium OS, you’re in luck, because Google has made Android Studio available through the Linux framework. Read on to find out how to get Android Studio up and running on Chrome OS.

Installing Linux

Before you can install Android Studio on Chrome OS, you’ll need to install Linux. This isn’t a dual-boot situation, though, so don’t worry. Google has added a feature to Chrome OS to run Linux apps without having to install Ubuntu/Arch/etc. and reboot. If you already have Linux on Chrome OS enabled, you can skip this section.

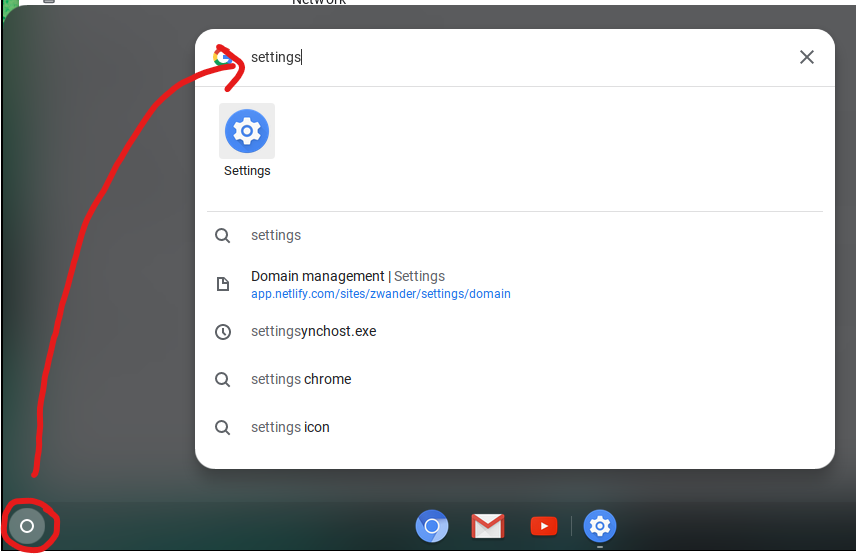
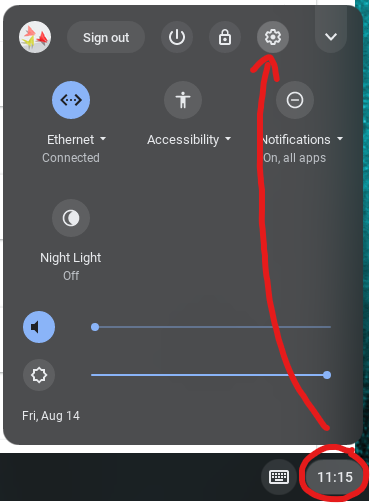
  1. Open Settings. You can do this by clicking the time in the bottom right of the screen and then clicking the gear icon, or by opening search (the circle in the bottom-left) and searching for Settings.
  2. In the left sidebar, click Linux (Beta) or scroll down to the bottom of the Settings window.
  3. Click the Turn on button in the Linux card.

    Click “Turn on” to enable Linux.

  4. At this point, a window should pop up telling you how much space Linux will take up. Click Next.

    Click “Next”.

  5. On the next screen, specify a username for the Linux installation, and then click Install.

    Click “Install”.

  6. Wait a few minutes for the installation to finish. A terminal window will appear. Close it.

If everything went well, you should now have Linux enabled on Chrome OS!

If you don’t see the Linux option in your settings, it likely means your Chromebook doesn’t support it. Most Chromebooks launched in 2019 or later support it, while some launched before 2019 support it. You can find a full list of such devices here.

Installing Android Studio

Now that you have Linux enabled, it’s time to install Android Studio.

  1. Download the Android Studio DEB for Chrome OS.

    Download the DEB for Chrome OS.

  2. Open Files and navigate to the Downloads folder.
  3. Right-click the downloaded DEB and select Install with Linux (Beta).

    Click “Install with Linux”.

  4. In the window that pops up, wait for the details to load, and then click Install.
    Install Android Studio on Chrome OS

    Click “Install”.

  5. You’ll get a notification telling you the progress of the installation. This might take a bit.
  6. Once the installation is finished, you’ll be able to find Android Studio right in the launcher in the Linux apps folder.

    Android Studio will be in your apps launcher inside the “Linux apps” folder.

That’s it! Setting up Android Studio on Chrome OS isn’t exactly simple, but it’s at least fairly straightforward.


Hopefully, this guide helped you get Android Studio set up on whichever operating system you may be using.

The post Android App Basics: How to install Android Studio on Windows, macOS, Linux, and Chrome OS appeared first on xda-developers.


from xda-developers https://ift.tt/323DhJx
via IFTTT