LightBlog

jeudi 16 septembre 2021

A complete guide to Shortcuts on macOS

We rely on technology to make our lives easier, to take shortcuts and avoid longer routes. But even through the use of tech, there are ways to simplify our workflows even further, whether we’re students or employees. Shortcuts is a first-party Apple app that was first introduced in iOS 12. This extraordinarily capable app has finally made it to the Mac, through the macOS 12 Monterey update.

Originally, Shortcuts was a third-party app called Workflow. As both previous and current names suggest, it’s an app designed to compile a series of bundled actions into a single button. Apple eventually acquired this app and rebranded it as Shortcuts, adding system-level privileges and more advanced features to it. What’s so great about it is anyone can use it — newbies and power users alike. There are actions that require almost zero experience in the matter and others that will demand some extra skills.

First look

screenshot of Shortcuts app on macos

Upon launching the app on your Mac, you’ll notice a major difference compared to its iOS counterpart — the Automation tab is missing. For those not familiar with the Automation tab or its purpose, it’s a section that triggers specific shortcuts based on certain, preassigned conditions. These conditions could be time of day, DND status, battery levels, Bluetooth/WiFi connectivity, NFC tag detection, etc.

So whenever your iPhone detects one of these conditions, it will trigger the specified shortcut for you. You don’t have to interact with your phone at all — in some cases at least.

screenshot of Automation tab on ios shortcuts screenshot of Automation creation on ios shortcuts

It’s hard to tell why the Automation tab is nonexistent on macOS, considering there are plenty of conditions the Mac could support. Apart from NFC, CarPlay, and maybe a couple more actions, macOS can theoretically support the automation conditions available on iOS. Whether Apple will add it by the time macOS 12 is out of beta — or maybe in a future update — is still unknown. We’ll have to wait and see what happens down the road.

Back to the Shortcuts main screen on macOS. You’ll be greeted by the Gallery tab, topping the My Shortcuts and Folders sections. My Shortcuts is divided into seven different categories:

  • All Shortcuts
  • Recently Modified
  • Recently Run
  • Share Sheet
  • Apple Watch
  • Quick Actions
  • Menu Bar

The Folders section contains whatever folders you personally create to categorize or group your individual shortcuts.

screenshot of emphasis on my shortcuts in shortcuts app on macos

Gallery

The Gallery is a great place to start exploring Shortcuts as a newcomer, thus being the first section in the app. It’s a collection of shortcuts, grouped based on their different functionalities and categories. These groups include:

  • Starter Shortcuts: very basic — but handy — ones, such as messaging your most recent photo to someone.
  • Shortcuts for Accessibility: mainly health and emergency focused, with shortcuts such as sending a message and location information to emergency contacts or tracking medication.
  • Great with Siri: shortcuts that may come in handy hands-free, through Siri. This collection includes a shortcut that ask Siri to tell you the weather and travel time to work, in addition to playing you a podcast.
  • Wonderful Widget Shortcuts: convenient to access through the Shortcuts app widget, such as a “play entire current album” shortcut.
  • Share Sheet Shortcuts: these shortcuts are focused on saving, sharing, or editing content you’re viewing. Some of the shortcuts include editing a Safari webpage, turning a webpage into a PDF, and adding a book to your wishlist.
  • Shortcuts for Apple Music: for everything Apple Music. Open genre playlists, play an artist, share your week in music, and much, much more.
  • Shortcuts for Sharing: from Mail to Twitter and Instagram. These shortcuts will make sharing content with others a tad easier, such as the “AirDrop screenshot” shortcut.

The Gallery also includes more collections, mostly focused on productivity. These include Get Stuff Done, Get Organized, Work from Anywhere, and over a dozen more.

Once you explore the Gallery and its shortcuts, you can start building your own. It doesn’t take long to grasp the logic behind them, and we’ll be detailing everything later on.

My Shortcuts

All Shortcuts

screenshot of my shortcuts section in the shortcuts app on macos

This section includes all the shortcuts you’ve added or created in the Shortcuts app. There’s a plus sign towards the top right that lets you create new shortcuts from there. You may also change the view from thumbnail to list and vice versa. A search bar is placed at the very right, making it easy to look up a certain shortcut you know the name of.

Recently Modified

screenshot of recently modified section in the shortcuts app on macos

This section displays shortcuts you’ve recently modified. It mentions on top when the last modification has occurred, and they’re sorted accordingly.

Recently Run

screenshot of recently run section in the shortcuts app on macos

Similar to the previous section, this one displays shortcuts you’ve recently run. It mentions on top when they were last triggered, and they’re sorted accordingly.

Share Sheet

screenshot of share sheet section in the shortcuts app on macos

This section lists shortcuts that support and show up in the share sheet of iOS and iPadOS — not macOS. Since the Shortcuts app offers iCloud sync, you’ll be able to view which of your shortcuts support that setting on iPhone/iPad, right from your Mac.

Apple Watch

screenshot of Apple Watch section in the shortcuts app on macos

watchOS 7 added the ability to run Shortcuts commands right from your wrist. This section shows which of your shortcuts have been synced to your watch.

Quick Actions

screenshot of Quick actions section in the shortcuts app on macos

This section shows shortcuts that you’ve added to Finder and Services Menu, through the shortcut creation settings.

Menu Bar

screenshot of menu bar section in the shortcuts app on macos

This section displays the shortcuts you’ve added to your Mac’s menubar for easy access.

Folders

screenshot of folders section in the shortcuts app on macos

As we’ve mentioned earlier, Folders is where your own groups live to better categorize your shortcuts. You may create as many folders as you want, and they’ll sync to your iDevices, as long as you have iCloud Sync on.

Preferences

Before you start creating your own shortcuts, it’s a good idea to go through the preferences and customize them as desired.

General

screenshot of general preferences in shortcuts app on macos

Under General, you’ll be able to toggle iCloud Sync on. This will keep your shortcuts up to date on all of your iDevices. You’ll also find a Private Sharing option that lets your contacts share shortcuts with you directly. Apple however warns you that it can’t verify whether received shortcuts are safe or not. Use at your own risk, basically.

Sidebar

screenshot of sidebar preferences in shortcuts app on macos

Sidebar preferences let you show or hide certain sections and folders from the sidebar of the app.

Advanced

screenshot of advanced preferences in shortcuts app on macos

Advanced preferences include advanced settings for more experienced users. If you’re still new to Shortcuts and everything feels too confusing, we’d advise you to leave advanced preferences as is — off. You can experiment with them eventually, once you’re more familiar with how everything works.

Shortcuts

Now the main sections have been explained in depth, it’s time to dig into the actual shortcut creation process!

Creation

screenshot of Shortcut creation process on macos

Start by clicking on the plus sign at the top right of the My Shortcuts section. A blank canvas will appear. This is where you’ll be building your first shortcut. You have to give it a name and optionally change the default icon. These can be done through the top left customization settings of the canvas.

There are 15 icon colors to choose from, but the actual icons are a few dozens. Animals, people, fictional characters, home appliances, the list of icons is endless. It’s almost guaranteed you’ll find one that matches the theme of your shortcut. Once you give your shortcut an identity, you’ll notice a “Hey Siri, [shortcut name]” phrase under its name. This is because you can trigger shortcuts through Siri, not only through physically clicking a button.

On the right side of the canvas, you’ll find two buttons — Action Library and Shortcut Details.

Action Library

This is where the magic begins. In this section, there are two main tabs — Categories and Apps. The former defaults to the Suggested option, which suggests a list of actions you might potentially want to add to your canvas.

Other options include All Actions, which lists every single action you can add, Favorites, Documents, Web, etc. Each of these options narrows down the list of shortcut actions to make finding what you’re looking for easier. So if you’re creating a music-focused shortcut, you know that you’ll probably find most of the actions you’re looking for under Media.

screenshot of Shortcut creation process on macOS 2

If you know which app offers the action you’re looking for, then the Apps tab is where you should head. From there you can click on your app of choice to view the list of available actions. It’s worth mentioning this section includes both first and third-party apps that support shortcut actions.

Shortcut Details

screenshot of Shortcut creation process on macOS 3

This part is divided into three sections — Details, Privacy, and Setup.

The Details section is basically the skeleton of the shortcut. There you get to decide where and under which conditions it should show up. These options include adding it to your Apple Watch, Share Sheet on iOS/iPadOS, or the Menubar on your Mac.

Under Privacy, you get to grant the shortcut special privileges, such as access to your music library. It’s pretty similar to how app permissions work on iOS. After all, shortcuts are like mini apps.

In Setup, you can add Import Questions in case you plan on sharing the shortcut with others.

Building

Once you’ve set everything up, you’re ready to start adding actions to your new shortcut. Building is a pretty straightforward process. You just drag and drop actions in a chronological order. Once you hit run, they’ll each start doing their tasks, one at a time. When an action is done, it passes whatever result it has got to the next action, and so on and so forth, until the end of the shortcut is reached.

screenshot of Shortcut creation process on macOS 4

In the screenshot above, I created a sample shortcut for your potential morning routine. It’s just a simple demonstration of how shortcuts work. In this case, the shortcut checks the weather, then speaks it out loud. After that, it plays a podcast from your library. Once the podcast starts playing, it’ll grab the latest items from your favorite RSS feed and display the articles neatly in Quick Look.

Most actions have self-explanatory names, so figuring out what each does shouldn’t be a challenge. Apple and third-party developers have also included further descriptions for vague ones. These descriptions fully explain what an action is supposed to do.

Now you know how the logic behind Shortcuts works. It can be extremely fun to experiment with, once you actually get the hang of it. And the best part? It will save you time and effort in the long run.

The post A complete guide to Shortcuts on macOS appeared first on xda-developers.


from xda-developers https://ift.tt/39aoqB5
via IFTTT

T-Mobile finally confirms when its 3G UMTS network will shut down

Carriers are quickly moving to re-farm their older network technology, and now T-Mobile has confirmed a new date for its 3G UMTS shutdown.

July 1st, 2022, is the new confirmed shutdown date for T-Mobile’s original 3G network. A leaked document last month seemed to indicate the 3G UMTS shutdown was set for October of this year, but it appears T-Mobile has decided to keep 3G around a bit longer.

As newer technology arrives, cell carriers must retire older equipment to make way for the new. The radio frequencies these older networks use can then be reused for things like 5G.

All three major carriers have plans to shut down their 3G networks. Verizon plans to shutter theirs in December of 2022, while AT&T is set to turn 3G off in February. T-Mobile has the added bonus of absorbing and redistributing Sprint’s old spectrum as well, which it has already put in use with its n41 mid-band 5G.

The decision to delay the 3G UMTS shutdown is likely due to the millions of IoT devices using 3G network technology. The manufacturers of these companies need time to deploy updated technology that can take advantage of the newer LTE and 5G network.

The company previously confirmed former Sprint network shutdown dates of January 1st, 2022, for CDMA and June 30th, 2022, for their LTE/5G. Those dates are also confirmed on this new support document.

There’s no word yet on what, if any, bonus promotions or free phones T-Mobile will offer to users of 3G-only devices. They’ve offered free 5G phones with trade-in of any other functioning phone since April, however those require a 2-year installment plan to technically be “free”. AT&T has been sending new phones to many customers with devices incompatible with their network, sometimes against their will, while Verizon’s shutdown is likely too far out to offer any promotional deals for 3G users.

The post T-Mobile finally confirms when its 3G UMTS network will shut down appeared first on xda-developers.


from xda-developers https://ift.tt/3Ak0czY
via IFTTT

Microsoft’s Surface event: What to expect and what not to expect

We’re now just weeks away from the launch of Windows 11, and we’re just days away from Microsoft’s next big Surface launch. If you’re a fan of the company’s hardware, it’s bound to be an exciting day that’s full of surprises.

So beware, there are spoilers ahead. We’ve got some ideas about what we’re going to see on September 22. In fact, we pretty much know which products are going to be announced.

Surface Book 4

When Windows 10 launched and Microsoft has a hardware launch alongside it, the Surface Book was a hero device. That’s going to be the case with the Windows 11 hardware launch. Surface Book 4 is getting a proper redesign, and it’s going to be a lot better.

The display isn’t going to be detachable anymore. In fact, it’s possible that the product might be called Surface Book Studio or Surface Laptop Studio instead, since the form factor will be more similar to the Surface Studio. It’s a design that’s been used by OEMs before, such as with HP’s Elite Folio. It allows you to use the device as a clamshell, and then pop out the screen and fold it as a tablet.

Concept of Microsoft Surface Book 4 on blue background

Surface Book 4 concept by Ryan Smalley

This opens up a lot of possibilities for Surface Book, as the old design had a lot of issues. For one thing, the existing lineup is very top-heavy, making it hard to use on your lap. The reason for that is because things like the CPU, one of the two batteries, the memory, and the storage all had to be in the display so it could still work when it was removed. With the new design, the display won’t be removed, so those components could be in the base.

Another benefit to keeping components in the base is that it could include more powerful CPUs, such as Intel’s 45W H-series. These are traditionally found in laptops for creators, which the Surface Book lineup has historically been billed as, but since the CPU was in the screen, the thermals needed weren’t possible.

Other things that you can expect to see are a larger 14-inch screen that might have a 120Hz refresh rate. In fact, Dynamic Refresh Rate might be a theme here. It’s also going to have dual USB Type-C ports, and Microsoft is still clinging to one Surface Connect port.

Surface Pro 8

The Surface Pro 8 is another product that we’re expecting to be redesigned, although not in such a major way as the Surface Book. First of all, it’s going to get a spec bump to Intel’s 11th-gen processors, which we’ve already seen in the Surface Pro 7+. The last time Microsoft used the same processors in two generations of the Surface Pro was with Surface Pro 2 and 3, and that third-generation model was the first full redesign of the Windows tablet, setting the template for the device we still see today.

Surface Pro 7 face down

Surface Pro 7

We’re expecting the front of the device to look more like the Surface Pro X, meaning that it will have smaller bezels and a larger, 13-inch 3:2 display. The Surface Pro 7+ has a 12.3-inch display, which is the same as it’s been since the Surface Pro 4. The top bezel will still likely be bigger, but that’s OK since the Redmond firm is pretty much the only OEM that’s been using 1080p webcams since 2014.

It will also have removable storage, just like we saw in the Surface Pro 7+. This is meant for businesses with sensitive data, so they can destroy it when they recycle the PC. It’s also going to get features like wake on touch and wake on approach, things that other OEMs have been highlighting over the past year. That will be another reason for additional sensors in the top bezel.

Finally, one report says that the Surface Pro 8 will have Thunderbolt in at least one configuration, so we’ll see about that.

Surface Pro X

It sounds like there’s going to be a new Surface Pro X at the event, although it’s mostly going to be internal changes. This is one of the more confusing rumors because Qualcomm hasn’t announced its Snapdragon 8cx Gen 3 yet. As we know, Microsoft’s SQ1 and SQ2 are basically overclocked Snapdragon 8cx processors.

Teaser image of Surface Pro 8

Teaser image from Microsoft’s event invitation

It’s possible that the SQ3 could just arrive ahead of the Snapdragon 8cx Gen 3, or it’s possible that the new Surface Pro X will still have an SQ2. It sounds like there’s going to be a Wi-Fi only model though, something that we’re seeing more and more with Windows on ARM devices.

Surface Go 3

The Surface Go 3 isn’t going to be a big change. In fact, it’s one of very few Surface products that got physical changes on its second generation, with the screen being enlarged from 10 to 10.5 inches. You can expect the chassis to stay the same, although removable storage is a possibility.

Surface Go tablet with kickstand propping it up

Surface Go

It will get a spec bump though, with options including a Pentium Gold 6500Y and a Core m3-10100Y. Both of these are 14nm processors from the Amber Lake Refresh family, and they should provide a pretty solid boost over the ones in the Surface Go 2.

As for why Microsoft is announcing the Surface Go 3 at this event, that’s unclear. Panos Panay has never unveiled a Surface Go at a product launch, as it’s not a hero product. Perhaps, this will be billed as a smaller tablet that will showcase Windows 11’s new touch optimizations.

Surface Duo 2

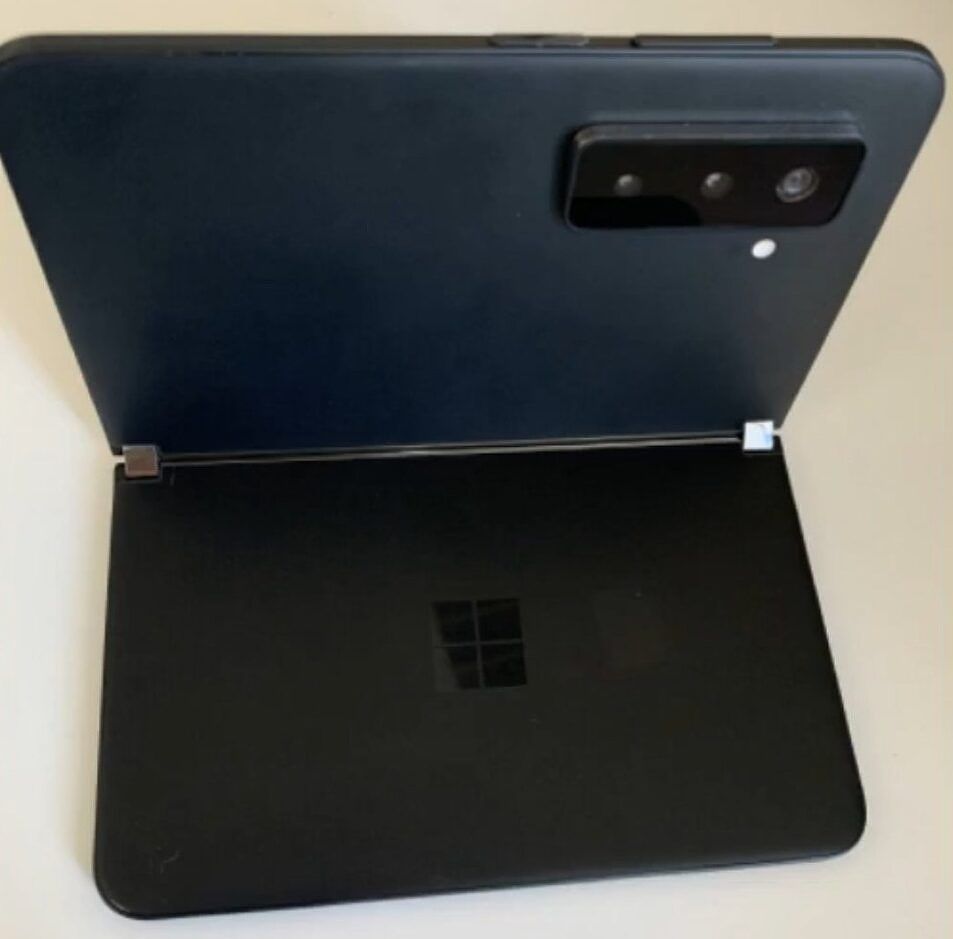
The Surface Duo 2 is expected to fix all of the problems with the first one. The first one came with a terrible camera and last-gen specs, so that’s what’s aiming to be fixed.

Surface Duo 2 in black

Leaked image of Surface Duo 2

The dual-screen smartphone is going to have a triple-lens camera with a rather unsightly camera bump. While critics have complained that this won’t allow the handset to be folded totally flat, it’s necessary if you want a decent camera. The Surface Duo 2 is such a thin device, it’s just physics to need more space for a camera that can perform well.

It’s also going to have a Snapdragon 888 chipset, which is the latest from Qualcomm. Indeed, the Surface Duo is a year old, but the Snapdragon 855 under the good is two years old. The Surface Duo 2 will also include 5G connectivity, another key item lacking from the $1,400 original model.

Not the Surface Neo

There are a few things that you should not expect. You definitely won’t see a Surface Laptop 5, as that was recently refreshed and will need Intel 12th-gen processors. Surface Studio is still weirdly MIA, despite the latest model still having Intel seventh-generation CPUs. And notably, you’re not going to hear about the Surface Neo, probably ever.

It’s my understanding that Microsoft has given up on all efforts to build out Windows for supporting dual-screen or foldable devices. That means that the Surface Neo will probably never see the light of day.

Microsoft Surface Neo and Surface Duo at launch event

Surface Neo next to the smaller Surface Duo

The Surface Neo was announced two years ago alongside Windows 10X and the Surface Duo. Windows 10X was billed as a new OS that was built from the ground up for dual-screen PCs, but eventually, Microsoft said it was going to repurpose the OS for single-screen devices. Windows and devices chief Panos Panay said that the plan was to meet customers where they’re at, despite the fact that you’d still need to buy a new PC to get Windows 10X.

He said that Microsoft would revisit dual-screen devices when the time was right, and then shipped Surface Duo anyway, since it ran Android. Windows 10X never shipped, and instead, Microsoft promised to build out some of its features into Windows 11. Those features do not include support for dual-screen devices.

Like I said, it’s my understanding that Microsoft has no intention of firing up that development again. The other, more obvious reason that the Surface Neo won’t ship in the form it was announced in is because Intel’s Lakefield processors are discontinued, so Microsoft would have to use something else. Presumably, there’s an Alder Lake processor that could do it though.

Product roadmaps do change, obviously, and Microsoft could always change its mind in the future about this. Just don’t get your hopes up.


That’s all we know about Microsoft’s Surface event, which will take place on September 22 at 11am ET. What are you hoping to see? Let us know in the comments!

The post Microsoft’s Surface event: What to expect and what not to expect appeared first on xda-developers.


from xda-developers https://ift.tt/3Al9Vq2
via IFTTT

Windows 11 VMs are going to require TPM 2.0

With all of the system requirement increases in Windows 11, one of the more prominent ones is TPM 2.0. However, that requirement is waived if you’re installing the new OS in a virtual machine, allowing you to test it out on unsupported hardware, as well as run it on things like Apple’s M1 Macs.

That’s going to change. Yesterday, Microsoft released Windows 11 build 22458 to the Dev channel, and at the time, the changelog only included some fixes and minor changes. Today, the blog post was updated to reflect that TPM 2.0 is now a requirement for VMs.

Later today, Microsoft released a new cumulative update for Windows 11 in the Beta channel, and that’s going to light up the TPM requirement as well. That means that when Windows 11 ships on October 5, TPM 2.0 is still going to be a requirement, even if you’re trying to run it in a virtual machine.

Microsoft has said that you’ll be able to bypass the new system requirements if you install the new OS with an ISO, rather than via Windows Update. The only problem is that that could leave you in an unsupported state. The firm says that you might not get updates if you use this method to install the new OS.

TPM stands for Trusted Platform Module, and it’s been a requirement in all new Windows 10 PCs since mid-2016. Because of that, it’s typically not a deal-breaker for installing Windows 11 on bare-metal hardware. The requirement for an Intel eighth-gen or newer CPU is more the issue, since theoretically, anything that new should already have TPM 2.0.

On Windows, you’ll need to create a Generation 2 VM in Hyper-V. If you’re using Parallels on Mac, you’re still going to be fine, even though Microsoft says that it’s technically an unsupported use case. Parallels comes with a virtual TPM, and the latest version is meant to officially support Windows 11. Whatever solution you’re using though, you’ll need support for some kind of TPM.

The post Windows 11 VMs are going to require TPM 2.0 appeared first on xda-developers.


from xda-developers https://ift.tt/3lupzJo
via IFTTT

Windows 11 deep dive: Clock with Focus Sessions

Windows 11 is almost here. With the release date set for October 5th, soon many of us will be using the brand-new operating system. Windows 11 brings a lot of changes compared to Windows 10, so it’s good to be aware of how things work in this new version. If you’re a Windows Insider, you may already be using the many new features already available in preview. But for everyone else, we’re here to help. As we journey to explore the biggest changes in Windows 11, this article focuses on the new Clock app with Focus sessions.

The app actually used to be called Alarms & Clock, so that’s the first change right there. But the big news is the addition of Focus sessions, a novel productivity feature Microsoft has added in Windows 11. This was actually first implemented in Microsoft Teams for business customers, but the Windows 11 version can be used by anyone.

What are focus sessions and how to set them up

As the name sort of suggests, Focus sessions are meant to help you stay focused on work for a period of time. They give you a timer so you know how much longer you have left to work, but they also set up breaks automatically so you can get some air.

When you first launch the Clock app on Windows 11, it opens right into Focus sessions, and it’s going to look somewhat like this:

Focus sessions in the Windows 11 Clock app

There are four elements here, so let’s start unpacking them. The first block is the timer for your focus session, and by default, it’s set to 30 minutes. You can increase the time you want to work for, and the app will automatically add breaks to allow you to get some energy back. However, you do have the option to skip breaks if you absolutely need to work without interruptions. You can also minimize the timer to a small floating window that’s always visible, so you don’t have to switch apps to see how it’s going.

Setting a timer for a focus session

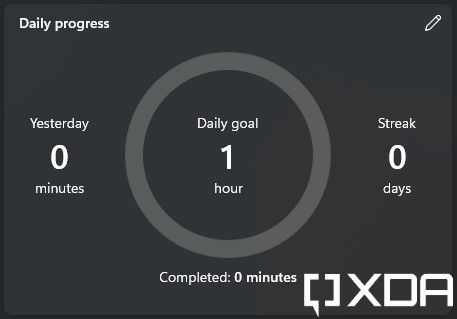
Next to the timer for your focus session, you get a box for your daily progress. You can set goals for how long you want to focus each day, and the app will keep track of how often you achieve that goal. You can see if you’ve been on a good streak for the past few days, or if you can’t keep up with your targets.

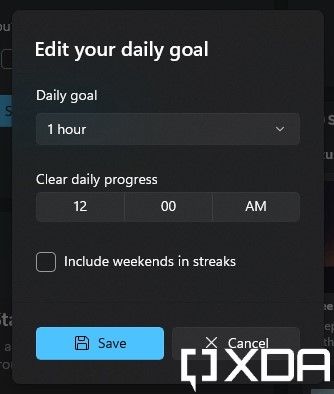
You can change your daily target by clicking the pencil icon in the upper right corner of this block. You can also set when the timer resets for measuring your daily progress, so if you work past midnight, you can still count focus sessions as part of the same day. Finally, you can also choose to include weekends in your progress streaks if you usually work on weekends as well.

Daily progress tracker in Focus sessions Setting daily progress goals for focus sessions

At its core, this is a very straightforward feature. Just start the timer and start working. You can change settings for breaks and focus periods in the app’s settings, but we’ll get to that in a bit. For now, there are a couple more blocks to explore on this screen.

Microsoft To Do and Spotify integration

There’s a bit more to Focus sessions than just a timer that keeps track of your goals. It’s meant to bring the tools you need to focus into a single screen, so you don’t have to constantly change contexts. That’s why there are two big integrations here — Microsoft To Do and Spotify.

Microsoft To Do is the company’s task management/to-do list app. By having it integrated into Focus sessions, you can look at your upcoming tasks and choose the ones you want to focus on during a focus session. You can choose just one or multiple ones, and you can mark them as completed within Focus sessions, too. It will depend on what kind of person you are, but some find it satisfying to check off to-do items and it can give you some extra encouragement.

Microsoft To Do integration in Focus sessions

This feature requires you to sign into the app with a Microsoft account, but there’s a good chance you’re already using one for Windows 11 anyway. You’ll see a sign-in button near the bottom left corner of the app window, and you can choose your Windows 11 account or a separate one. This allows you to access to-do lists you’ve already created and sync your progress across devices.

Then there’s Spotify integration, and this is also a neat addition. Music can often help us stay focused, drowning out background noise. With Spotify integration, Focus sessions give you a handful of music types to listen to during your session. You can choose from white noise, lo-fi beats, smooth jazz, and more. These are all abstract types of music, meant to help you focus rather than distract you.

Spotify playlists in Focus sessions

To get this feature to work, you need to install the Spotify app, and if you don’t have it yet, you’ll see a link to download it from the Microsoft Store. You also need to sign into the Spotify app, and then sign into Spotify again through Focus sessions. Once that’s done, you’ll be ready to go.

Focus sessions settings

If you want to tweak your experience a bit further, you can head into the Clock app’s settings to change certain aspects. Click Settings in the bottom left corner of the app window, and you’ll see a bunch of options, mostly related to focus sessions.

Here, you can set options for your focus and break periods. By default, breaks last five minutes, and focus periods are adjusted automatically based on the total length you choose to work for. However, you can set a specific length for each focus and break period if you prefer.

Focus sessions settings in the Clock app

You can also choose different alarm sounds for when a focus session ends, as well as for when a break period ends. Finally, you can choose to disable the Spotify and Microsoft To Do integrations altogether.

Outside of focus sessions specifically, you can choose your app’s theme on this page, and delete your personal data from your device.

Other features in the Clock app

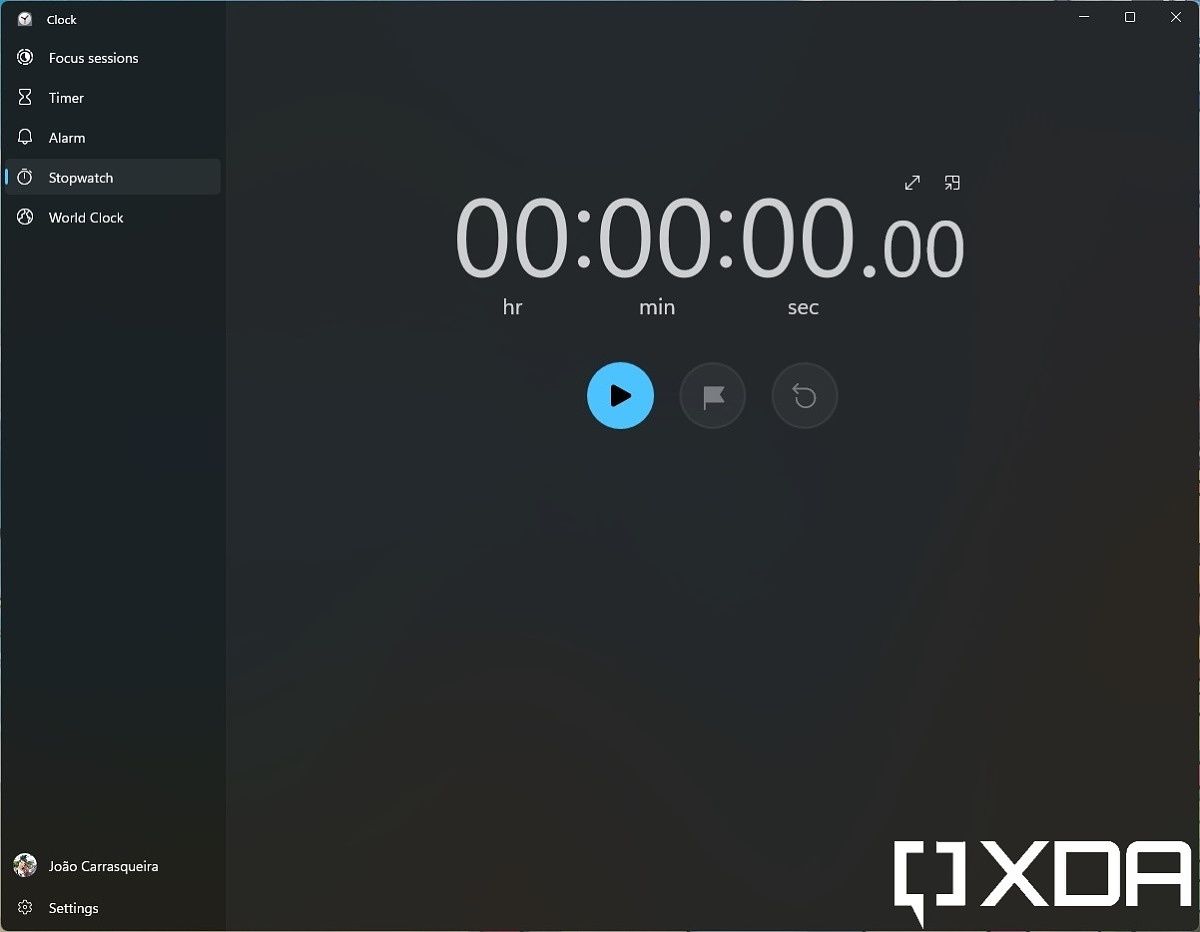
Aside from Focus sessions, the Clock app in Windows 11 is almost identical to the one on Windows 11. You can set alarms, timers, use a stopwatch, or see a world clock highlighting cities of your choice. However, there are some noteworthy changes, specifically in terms of UI design. You’ll see new icons throughout the app, rounded corners, and other small UI tweaks. The blocks for each alarm in the Alarms section are now wider, and the time picker when setting a timer has a slightly different look, among other changes.

Alarms section in the Clock app Stopwatch in the Clock app Timer section in the Clock app World clock in Clock app

The most notable change however, is that timers and the stopwatch can now be set to be small floating windows, just like focus sessions. That means you can see them over anything else you’re doing, without having to accommodate for a large window or snapping apps side by side.


And that’s all there is to the new Clock app with Focus sessions. This is one of the many big features Microsoft added to Windows 11 that help users be more productive on their PC, which has become increasingly important in the age of hybrid and remote work. Of course, we’re going to be diving into other new features in Windows 11, so stay tuned for more guides like this.

Want to upgrade to Windows 11? Make sure your PC meets the system requirements, or check out our list of all the PCs that will support the Windows 11 upgrade.

The post Windows 11 deep dive: Clock with Focus Sessions appeared first on xda-developers.


from xda-developers https://ift.tt/3hEEqzQ
via IFTTT

Best Samsung Chromebook 4 accessories: Anker, Dell and more

The Samsung Chromebook 4 is one of the most popular budget Chromebooks out there. If you recently bought a Samsung Chromebook 4, you’ll want to add some sweet accessories to enhance your experience. It’s always nice to have a case or sleeve to carry your Chromebook around. Those that want to use the Samsung Chromebook 4 as a productivity machine will also want to pick up a docking station. Of course, there are numerous other accessories to consider — styli, webcams, and more.

In this guide we’ll take a look at the essential accessories currently available for the Samsung Chromebook 4.

Navigate this article: 

Best docking stations for the Samsung Chromebook 4

If you’re looking to use your Chromebook with an external monitor, you’ll likely want to add a docking station to increase the number of available ports. With a good docking solution, you can greatly expand your Chromebook’s versatility. You can use it to connect a mouse, a mechanical keyboard, external storage devices, multiple monitors, or all of them at once.

On top of that, with some docking stations, you can even keep your Chromebook charged as long as it has a compatible USB Type-C port or Thunderbolt port. Docking stations are great for students as well as business users that dock their machine at the office.

    Tiergrade USB-C Docking Station

    Best overall

    The Tiergrade USB C Chromebook docking station is perfect for power users. It offers the widest selection of ports, including two USB 3.0 Type-A ports, two USB 2.0 Type-A ports, two USB 3.0 Type-C ports, two HDMI ports, a DisplayPort port, an RJ45 Gigabit Ethernet port, 3.5mm headphone and mic jacks, a S/PDIF audio port and a USB 3.0 Type-C port with 60W power delivery. On top of that, the dock also includes a full-sized SD card reader and a microSD card reader.
    Baseus 16-in-1 Docking Station

    Best budget alternative for power users

    The Baseus 16-in-1 Chromebook docking station is a cheaper alternative to the Tiergrade dock with a slightly different port selection. It includes three USB 3.0 Type-A ports, two USB 2.0 Type-A ports, two USB 3.0 Type-C ports, a USB type-C port with pass-through charging support, an RJ45 Gigabit Ethernet port, a 3.5mm headphone/mic combo jack, a microSD card slot, and an SD card slot. For display connectivity, it features a VGA port and an HDMI port. However, it only supports screen mirroring for dual external displays.
    NOVOO 8-in-1 USB-C Dock

    Best portable

    The NOVOO 8-in-1 USB C dock is the tiniest Chromebook Docking Station on this list, earning it the most portable title. Despite its tiny size, it packs 3 USB 3.0 Type-A ports, an Ethernet port, a USB Type-C port with up to 100W passthrough charging, an HDMI port, and an SD card reader. That's a lot of ports for something as tiny as this. Makes me wonder why some fruity OEMs can't offer more than two USB Type- C ports on their laptops.
    Anker PowerExpand+ 7-in-1 USB C Hub

    Best budget portable

    If you're not willing to spend $40 on a tiny USB C hub, then the Anker PowerExpand+ should be a better option. It's slightly larger than the NOVOO USB C dock, but features the same number of ports. This includes two USB 3.0 Type-A ports, a USB Type-C port for data, a USB Type-C port with pass-through charging support at up to 100W, an HDMI port, and an SD card reader. It should get the job done if you have basic needs.
    Sabrent Universal Laptop Docking Station

    Best for Chrome OS tablets

    The Sabrent Chromebook docking station is a good choice for Chromebooks with a detachable keyboard as it features a stand that you can use to prop up your Chromebook when you're not using the included keyboard. In terms of ports, it offers two USB 3.0 Type-A ports, two USB 2.0 Type-A ports, two USB Type-A 2.4A fast charging ports, an HDMI port, a DVI port, a USB 3.0 input, 3.5mm headphone and mic jacks, and a RJ45 Gigabit Ethernet port.
    Targus USB-C Universal Docking Station

    Best with built-in stand

    The Targus Chromebook docking station is a good 2-in-1 option that not only offers a decent selection of ports but also doubles up as an ergonomic stand. It includes 4 USB 3.0 Type-A ports, two DisplayPort ports, 2 HDMI 2.0 ports, a USB Type-C port with 60W pass-through charging support, a headphone / mic combo jack, and a RJ45 Gigabit Ethernet port.

Best external monitors for the Samsung Chromebook 4

Monitors come in a variety of sizes, and span the price spectrum from fairly cheap to incredibly expensive. When choosing an external monitor to use with your Chromebook, you should carefully consider your use-case as well as your budget. Here, we’ve rounded up the best monitors for 4K performance, creative professionals, and those looking to get the best overall bang for their buck.

    HP 24MH

    Best budget

    The HP 24mh is a 24-inch budget monitor that offers a good set of features for the asking price. It uses an IPS panel which means better colors and viewing angles and it also offers great sRGB coverage. The monitor also features three inputs (HDMI, DisplayPort, VGA), a functional stand with height, pivot, and tilt adjustment, as well as built-in speakers.
    Lenovo ThinkVision M14

    Best portable

    Looking for an external monitor that you can carry with you? Lenovo offers its customers the ThinkVision M14 that features a 14 inch full-HD panel and dual USB-C ports for a seamless connectivity experience.
    Dell Ultrasharp U2719DX

    Best overall

    This monitor offers great color accuracy and sharp visuals with 1,440px resolution. It also comes with a great industrial design with slim bezels and a good set of I/O connectivity.
    HP U28 4K

    Best 4K

    HP's U28 features a factory-calibrated 4K HDR IPS panel which is great for studio work and it also features a host of I/O ports.
    LG 29WP60G-B

    Best ultrawide

    The LG 29 inch ultra-wide monitor should be great for users looking for loads of screen real estate. It comes with a 29 inch wide IPS panel offering a full-HD (2560 x 1080) resolution, 21:9 aspect ratio, 99% coverage of sRGB color gamut, HDR10, and AMD FreeSync.
    ASUS ProArt Display 27

    Best for creative use

    The ASUS ProArt PA279CV is suited for customers looking for an external display for the purpose of photo or video editing. It features a 27 inch 4K resolution IPS panel that offers 100% sRGB coverage, factory calibrated for Delta E < 2 color accuracy and a USB-C port for seamless connectivity.

Best mice for the Samsung Chromebook 4

When shopping for a new mouse to pair with your favorite Chromebook, comfort is king. In this list, we’ll prioritize the comfortable operation of each mouse over other advanced features. After considering day-to-day usage, we’ll look at battery life, price point, and of course integration with Chrome OS. Mice come in all shapes and sizes, so it’s worth viewing a large volume of options before reaching a final decision.

    Seenda 2.4G wireless mouse

    Best budget mouse

    If you need a wireless mouse on a budget, Seenda has you covered. This mouse lacks some bells and whistles, but costs under $6 and has a comfortable design. Battery life is excellent on this device. For those who only use a mouse on occasion, this is the way to go.
    Logitech M355

    Best slim and flat design

    Some mice require you to choose whether you are left or right handed, but not the Logitech M355. This mouse has a slim and flat design, perfect for ambidextrous users. In addition, the slim profile and ultra-quiet clicks make this a great mouse to use at work.
    Jelly Comb mouse and keyboard combo

    Best mouse and keyboard bundle

    Bundles are never a bad thing in terms of value. Jelly Comb packages an excellent wireless keyboard and mouse combo for under $25. Both devices feature excellent battery life, and an auto sleep mode when not in use.
    Logitech MX Master 3

    Best for productivity

    The Logitech MX Master series is the industry standard for what a mouse should be. Ultra-fast mag speed scrolling, ergonomic design and app-specific customization make this an ultra-premium pick. With USB-C quick charging and the ability to work on glass surfaces, this is a mouse you can use anywhere.
    Logitech M510

    Best battery life

    Logitech obviously has several options when it comes to mice. The M510 is a standout thanks to its consistent rating as a battery life champ. Users report a year or more average use on a single charge. With a comfortable design and a price under $25, this is an excellent option.
    iClever Ergonomic Mouse

    Best curved vertical mouse

    If you find the Anker vertical mouse a bit too tall or rigid, iClever has another exciting option. This vertical mouse features a more dramatic curve that contours to the hand at a more shallow angle. At under $25, with whisper quiet keys, this mouse is great for home or work.

Best sleeves for the Samsung Chromebook

Chromebooks are made to be portable.  To protect your investment when out and about, you can grab a sleeve or bag at a fairly low price. This is even more important if you have an LTE-capable Chromebook and travel often. Most of these options are on sale often, making the deal even sweeter. With so many options available, you can find something that fits your personal style and has functionality for daily work and play.

    Amazon Basics Executive Laptop Sleeve

    Best basic sleeve

    If you just want a basic sleeve with no frills, Amazon has you covered here. This sleeve's size ranges from 11.6 inches up to 15.6 inches, depending on the size of your Chromebook. With three color options to choose from and a low price, grab this if you just need to carry your Chromebook outside on occasion.
    Case Logic Carrying Case 13/14

    Best carrying case

    If you need extra protection for your Spectre x360 when carrying it around, the hard shell on this sleeve can do just that. Meanwhile, the inside is soft to absorb any impact from your laptop moving around.
    Nacuwa Hard Sleeve

    Best hard sleeve

    If you want top of the line protection, get this hard sleeve from Nacuwa. With a range of size options, this sleeve is suitable for any Chromebook. You also get protection from spills, and a few inner pockets to organize cables and your laptop charger.
    UNIKA Leather Sleeve

    Best leather sleeve

    For those that want an elegant sleeve, UNIKA has a nice selection of color options. This sleeve features an ultra-thin design and accommodates 13-15 inch Chromebooks.
    Lymmax shockproof sleeve

    Best shockproof sleeve

    Sometimes we all have a clumsy day or two. With the Lymmax shockproof sleeve your laptop will stay protected even if you drop it. This sleeve comes in a range of color options but is limited to 13-15 inch size compatibility.
    Nillkin laptop sleeve with stand

    Best sleeve with stand

    Would you like a laptop sleeve that doubles as a stand? Nillkin offers just that at a price under $30. With four color options to choose from you should be able to find one that matches your personal style.

That completes our roundup of the best available accessories for the Samsung Chromebook 4, one of the best Samsung Chromebooks out there. Keep in mind Amazon constantly discounts several of these products, so it’s wise to often keep an eye out. You can also set up a page monitor to get notified of any drastic price drops. The Samsung Chromebook 4 is also available from Samsung with bulk education pricing, great for teachers or schools that need several devices.

Let us know which accessories you use for your Chromebook travels.  If you try out some of our picks, let us know how they work for you in the comments as well.

The post Best Samsung Chromebook 4 accessories: Anker, Dell and more appeared first on xda-developers.


from xda-developers https://ift.tt/3Al2Fui
via IFTTT

Here are more games coming to Xbox Game Pass in September 2021

Microsoft is adding several new games to Xbox Game Pass for the second half of September, with 13 games coming to the service. If the first half of the month was light on new games, then the second half gives subscribers plenty of entertainment.

Several of the new games — 8 out of the 13 — that are being added in the second half of this month are Day One releases, meaning that they’re launching on Xbox Game Pass on the same day they’re launching everywhere else. These include (but aren’t limited to) Aragami 2, Sable, and Lemnis Gate. It’s good to see that Xbox Game Pass subscribers are being given access to so many new games.

  • Flynn: Son of Crimson (Cloud, Console, and PC) ID@Xbox – September 15
  • I Am Fish (Cloud, Console, and PC) ID@Xbox – September 16
  • SkateBird (Cloud, Console, and PC) ID@Xbox – September 16
  • Superliminal (Cloud, Console, and PC) ID@Xbox – September 16
  • Aragami 2 (Cloud, Console, and PC) ID@Xbox – September 17
  • Lost Words: Beyond the Page (Cloud, Console, and PC) – September 23
  • Sable (Cloud, Console, and PC) ID@Xbox – September 23
  • Subnautica: Below Zero (Cloud, Console, and PC) ID@Xbox – September 23
  • Tainted Grail: Conquest (PC) ID@Xbox – September 23
  • Lemnis Gate (Console and PC) – September 28
  • Astria Ascending (Cloud, Console, and PC) – September 30
  • Unsighted (Console and PC) ID@Xbox – September 30
  • Phoenix Point (Console) ID@Xbox – October 1

As always with Xbox Game Pass, when games are added, other games have to be removed. These are the games that are leaving Xbox Game Pass on September 30:

  • Drake Hollow (Cloud, Console, and PC)
  • Ikenfell (Cloud, Console, and PC)
  • Night in the Woods (Cloud, Console, and PC)
  • Kathy Rain (PC)
  • Warhammer Vermintide II (Cloud and Console)

Also worth noting is that two of Xbox’s free Games with Gold for the month will be available starting on September 16: Mulaka and Samurai Shodown II.

The post Here are more games coming to Xbox Game Pass in September 2021 appeared first on xda-developers.


from xda-developers https://ift.tt/3nCD0tg
via IFTTT