LightBlog

vendredi 24 décembre 2021

First 10 things to do with a new Samsung Galaxy Phone

Bought yourself a shiny new Samsung Galaxy phone? You might need some help familiarizing yourself with the interface or a few tips that will help you make the best out of your new purchase. That’s exactly what you’re going to find in this article! Whether you’re new to Samsung’s phones or just upgrading from an older model, we’ll tell you the first 10 things you should do with a new Galaxy phone to ensure you have the best experience. So, grab your phone, sit back, and follow these simple steps to customize the device to its full potential!

Navigate this article:

  1. Disable Ads/Promotions during Setup Process
  2. Transfer Data from your old phone
  3. Customize your Homescreen
  4. Setup Secure Folder for Sensitive Data
  5. Remap the Bixby Button
  6. Set up Always on Display
  7. Use Dual Apps for Messengers
  8. Improve Multitasking with Edge Panels
  9. Extend Battery Life with Power Saving Modes
  10. Customize every single aspect with Good Lock!
    Samsung Galaxy A52 5G

    Best mid-range Samsung phone

    The Galaxy A52 5G is a capable mid-range smartphone from Samsung that covers all basics. If you're looking for a reliable phone without breaking the bank, this is the one you should consider.
    Samsung Galaxy Z Flip 3

    Best foldable for most people

    The Galaxy Z Flip 3 is the most affordable foldable phone that doesn't make a lot of compromises. It has the latest chip, a unique design, and even includes an IP rating this year. It's a head-turner for sure!
    Samsung Galaxy S21 Ultra

    The ultimate flagship phone

    This is the best smartphone that you can get from Samsung that covers all bases. It's got solid performance, the most versatile set of cameras, and a gorgeous display. This one's the do-it-all.

1. Disable Ads/Promotions during Setup Process

The first thing you do when you get a new phone, apart from inserting your SIM card into it, of course, is going through the initial setup process. This is quite straightforward as the instructions are displayed on the screen as you navigate through the entire process. However, there are a few options during setup, that if selected, may not result in an ideal experience while using the phone.

For example, Samsung is known to display ads and send promotional notifications on some of its phones. This can be avoided by deselecting any such options that ask for your permission to display promotional content. It’s easy to overlook such checkboxes while setting up the phone, but the rule of thumb is don’t blindly agree to and select every option shown to you on the screen. Make sure you read the options on the screen thoroughly and select only the ones that are absolutely essential to use the phone.

Setup Process on OneUI 4.0

While setting up your Samsung account, you will be asked to agree to various terms and conditions, some of which are mandatory, while the others are optional. The Terms and Conditions, Special terms, and Samsung account Privacy Notice have to be ticked compulsorily for you to proceed further. Select these options only. Do not select the ‘I have read and agree to all of the above’ option.

Samsung phone setup process Recommended apps Samsung apps

Once you enter your details, you will see a screen that says Review additional apps. Uncheck the All of the following apps checkbox and select only the apps that are important to you. If you don’t use any of the apps listed, you can skip through this step entirely. Samsung will also ask you to Get recommended apps which are essentially Samsung’s first-party apps, and we could see no way to skip this.

Setup Process on One UI 3.0 and earlier

Agreeing to the End User License Agreement and Privacy Policy are absolutely essential without which you won’t be able to use the device. However, Sending of Diagnostic Data, Information Linking, and Receipt of Marketing Info are optional and we urge you to uncheck these checkboxes, especially the last one. Generally, users tend to select the Agree to all the above option amidst the excitement to use the phone. You shouldn’t be doing that. Some budget and mid-range Samsung phones also come with a Lock Screen Stories option that displays unwanted content on the lockscreen. Disable it if you see the option during setup. If you see any other option that has Allow Recommendations… in it, it’s wise to uncheck it.

Screenshot of Samsung services screen Screenshot of the options to select on Samsung services screen Screenshot of Samsung services screen Screenshot of app recommendations being pushed to the user

Another thing to note while setting up the phone is to not install any unnecessary app from the Recommended apps list. Samsung will try and push you to install apps they’ve partnered with, but it’s best to deselect the ones you don’t need or use. You can install specific apps that you need later on via the Play Store, or restore a backup/transfer data from an older phone which would restore all the apps you use.

2.  Transfer Data from your old phone, including an iPhone!

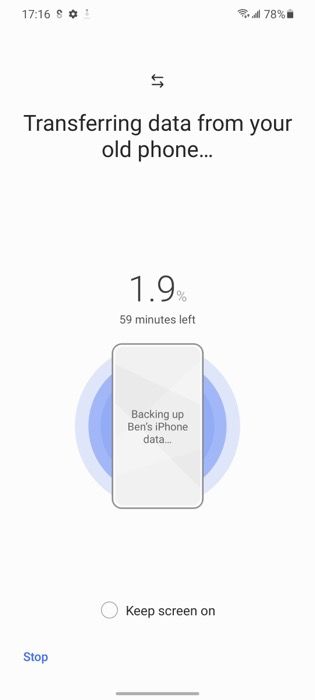
Samsung gives you a nice option to migrate your data from an older phone to your new Galaxy phone. It’s called Samsung Smart Switch and the option to use it is presented to you while setting up your new Samsung device. What’s cool is that by using this process, you can transfer all your existing data from your old smartphone to your new device. This includes apps, messages, photos, videos, etc. The best part is that Smart Switch even lets you transfer your data from an iPhone to your new Galaxy phone.

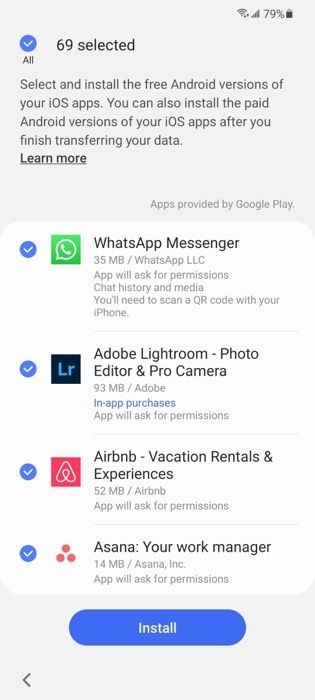
Cable connection whatsapp migration from ios to android Transfer process on Smart Switch Whatsapp installation on Android

If you’ve switched over from iOS to Android since it’s clearly the better smartphone OS (sorry, Mahmoud), you will be able to install the same set of apps on your new phone that you previously used on your iPhone. In fact, you can now transfer WhatsApp chats from iOS to Android if you have a Samsung Galaxy phone, and we recommend you do this early on as the process works only if your phone is in a brand new state. If you don’t have your older phone with you because you traded it in for a new one, you can even restore a backup from your old phone alternatively.

3. Customize your Homescreen

Alright, you’ve set up the phone and you’re into the UI. Now what? Well, the beauty of Android is that you can customize various aspects of your phone to no limits. While some customizations require additional apps like launchers or mods for power users, you get a ton of options in-built especially on Samsung devices. The homescreen of your device is what you interact with when you first unlock your device, so it’s a good idea to customize it as per your liking.

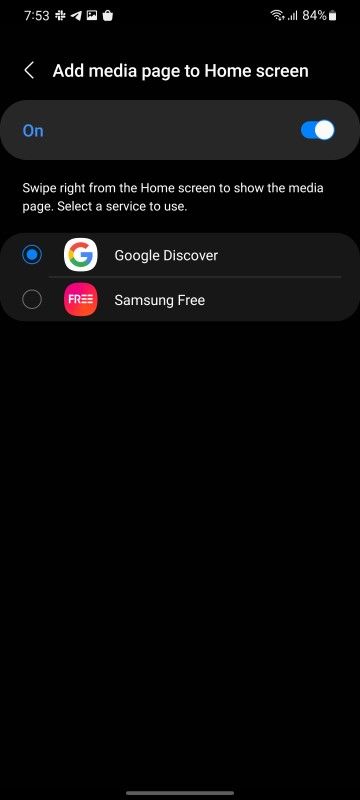
Homescreen screenshot Homescreen customization screenshot Minus 1 page options Homescreen customization screenshot Homescreen customization screenshot Minus 1 page options

You can change the wallpaper, add widgets, try a different icon pack, or even change the grid size on the homescreen. To do this, tap and hold an empty area on your homescreen to bring up the homescreen menu. Now, tap on Home screen settings. Here, you can choose the homescreen grid size, enable/disable notification badges on apps, and even hide your apps from the app drawer.

By default, Samsung also displays a Bixby pane to the right of the homescreen on some devices. You can disable this by holding an empty area on your homescreen to bring up the homescreen customization menu. Now, you’ll see all your homescreens as scrollable windows. Scroll to the left-most window which is Bixby home. You’ll find a toggle about it which you need to disable.

4. Setup Secure Folder for Sensitive Data

This is a feature that’s quite underrated on Samsung Galaxy phones. Samsung devices have Knox security and a part of that is something known as Secure Folder. Enabling the option basically creates a folder on your phone that is encrypted with a PIN or pattern that’s different from the one used to unlock your phone. Once you create a Secure Folder, you can store sensitive information and data like photos, account numbers, documents, in it.

Several people store their credit card numbers, PINs, etc. on their smartphones. While that’s not a good practice, Secure Folder just adds an additional layer of security for such information. Even if someone else manages to get into your phone, they will also have to get through the additional security of the Secure Folder to access your personal information. Note that Secure Folder is present only on some Galaxy phones, mainly mid-range and flagship phones. If you have a budget-oriented Samsung device, chances are that you may not have this feature.
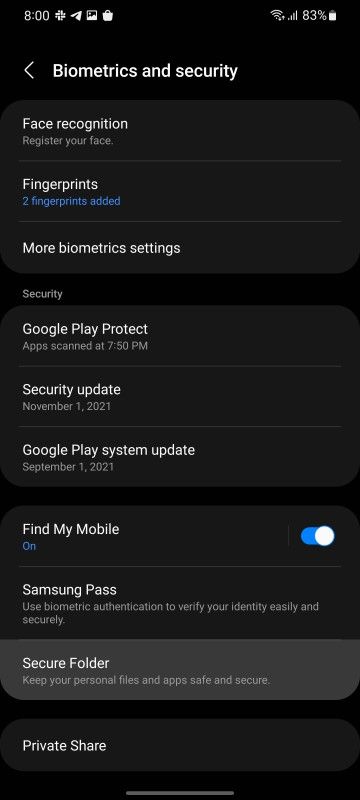
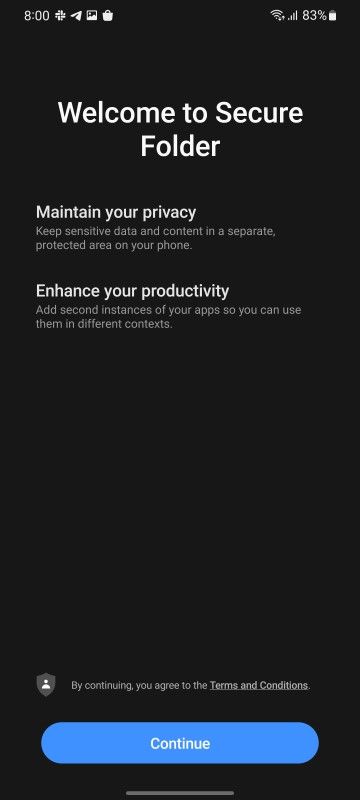
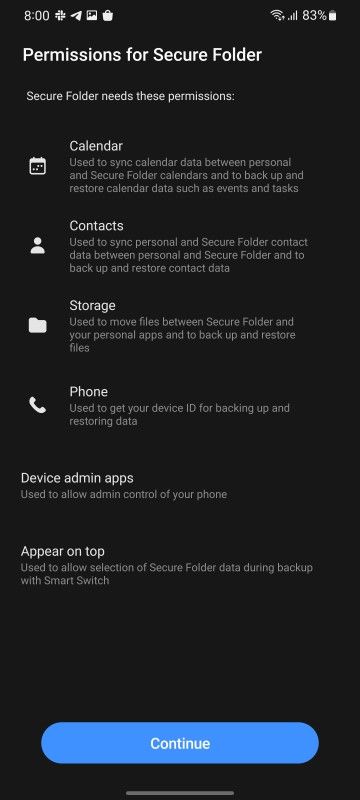
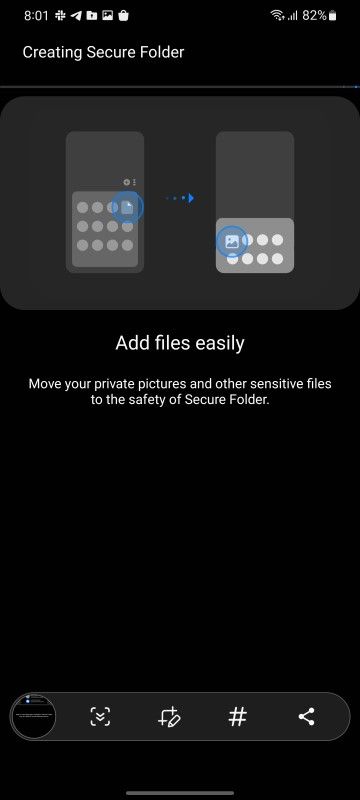
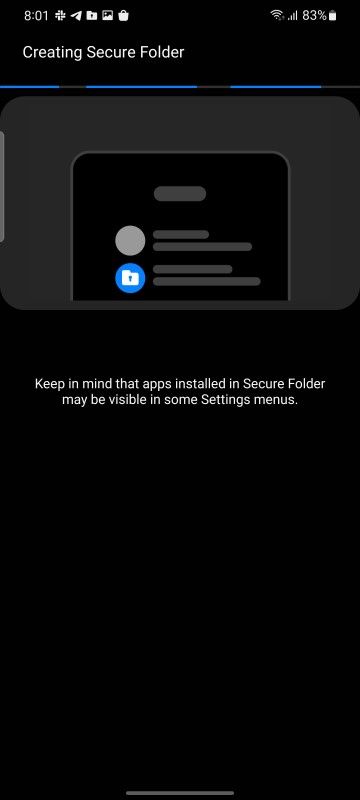
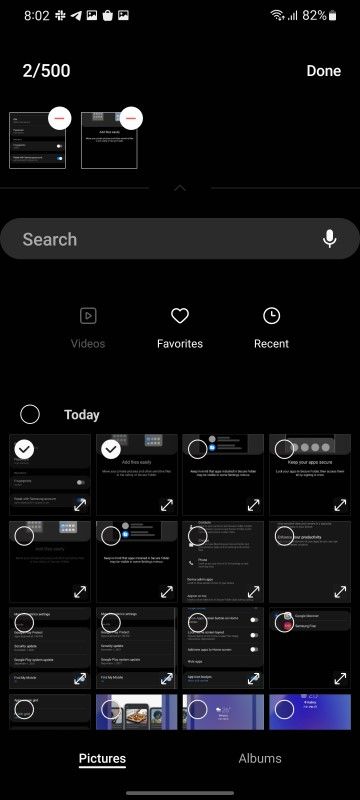
Screenshot showing Secure Folder setup and options Screenshot showing Secure Folder setup and options Screenshot showing Secure Folder setup and options Screenshot showing Secure Folder setup and options Screenshot showing Secure Folder setup and options Screenshot showing Secure Folder setup and options Screenshot showing Secure Folder setup and options Screenshot showing Secure Folder setup and options

If you wish to set up the Secure Folder feature on your phone, head over to Settings > Biometrics and Security > Secure Folder. You will be prompted to sign in with your Samsung account now if you hadn’t done it already. Once done, you can enter the password to access Secure Folder followed by setting up a biometric way to access it like your fingerprint. Once this is set up, you can add files or whatever you want into the Secure Folder. If you wish to move existing files or photos to the Secure Folder, go to the Gallery app, long-press on the item you wish to move, and select the Move to Secure Folder option.

To access Secure Folder, you can either tap on the icon in your app drawer or the quick toggle in the notification center.

5. Remap the Bixby Button

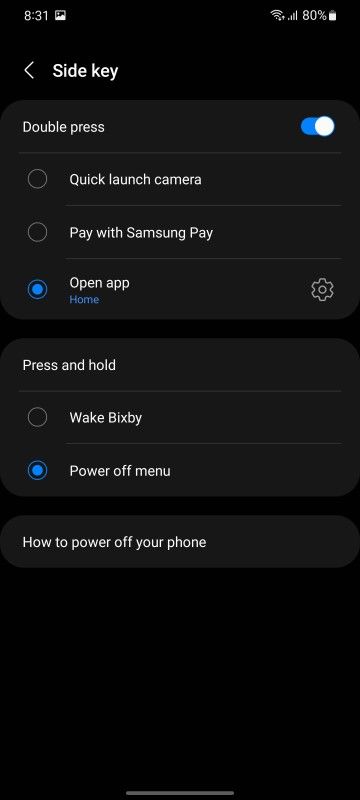
By default, the key on the side of your Galaxy phone is used to turn the screen on/off with a single press. While that functionality cannot be changed, you can customize the long-press and double-press functionality of the key. To do this, head over to Settings > Advanced Features > Side Key. Here, you can select what function you want to assign to the power button when you double-press it or press and hold it.

Settings menu screenshot on Samsung Advanced Settings menu screenshot on Samsung Bixby button Settings menu screenshot on Samsung

I like keeping my double-press setting to launch the camera app. It’s a nifty little shortcut for when you want to open the camera app quickly and don’t have the time to unlock the device, get to the homescreen, and then launch the app. The press and hold option is set to Wake Bixby by default which can get rather inconvenient if you don’t use Samsung’s assistant. You can change the Press and hold option to trigger the Power off menu like how it used to be conventionally on all phones a few years back. This way, pressing and holding the power button will enable the power off and reboot options instead of triggering Bixby.

6. Set up Always on Display

If your Samsung phone comes with an AMOLED display, there’s a good chance it has Always on display functionality. If you’re not familiar with the feature, Always on display is literally what the name says — it keeps your display always on to show you important information like the time, date, calendar events, pending notifications, etc. It’s pretty useful if you don’t want to constantly turn on the screen of your smartphone to check the time or notifications and end up using the phone for a lot of time.

Samsung Settings Samsung Always On Display Samsung Always On Display Settings

To enable Always on display on your Galaxy phone, head over to Settings > Lock Screen > Always on Display. Here, you can choose whether you want it to show up for 10 seconds or let it remain on all the time. I prefer the latter. You can also choose the clock type and what information you want to be displayed. Once you start using this feature, you just cannot live without it.

7. Use Dual Apps for Messengers

Samsung has added a nifty feature in One UI that lets you create a cloned version of an app and use two versions of the same app on your phone. If you have two SIM cards and you want to use two WhatsApp accounts or two versions of Facebook Messenger for two different accounts, you will be able to do it natively by following a few simple steps.

Dual App setting on Samsung One UI Dual App setting on Samsung One UI

Head over to Settings > Advanced Features > Dual Messenger. Here, you’ll see the list of apps installed on your device that can be duplicated into a secondary app. Select the apps that you want a secondary version for and tap Install. Wait till the process is done, and you now have two versions of the same app. A secondary version of the same app is denoted by a small orange banner on the bottom right corner of the app icon on the homescreen as well as the app drawer. You can use that to differentiate between the two apps.

To disable the second version of an app, head over to the same menu and turn the toggle off next to the app.

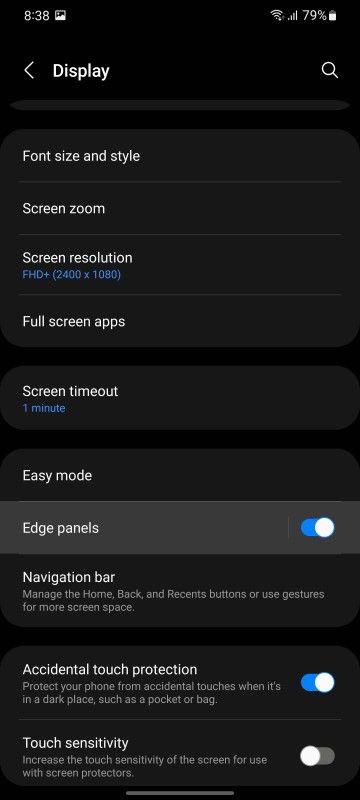
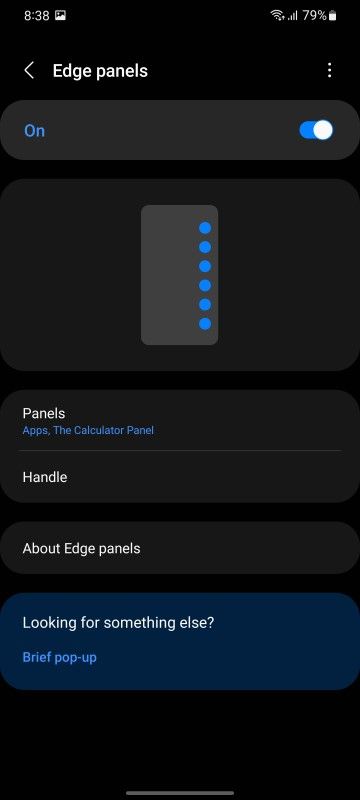
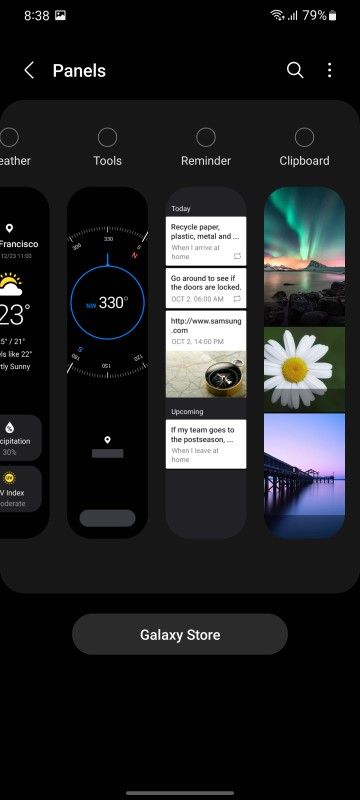
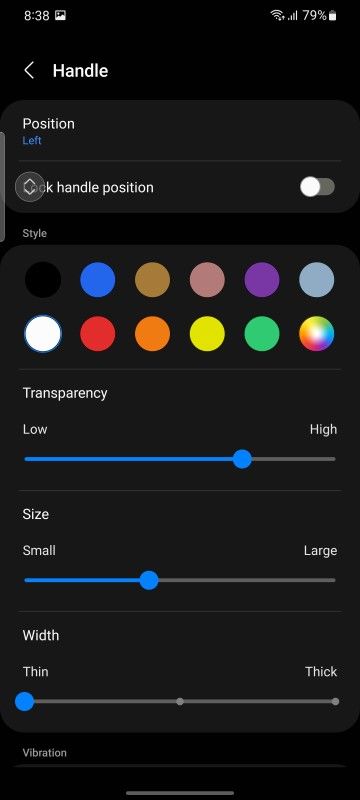
8. Improve Multitasking with Edge Panels

The Edge panel was first introduced to add extra functionality to the curved edges on Samsung flagships. Since then, it has made its way to several Samsung phones and is a great tool if you multitask a lot on your phone. It’s a small translucent bar that rests on the edge of your display. Tapping on the bar reveals several options like quick shortcuts, various screenshot methods, favorite contacts, media controls, clipboard, etc. You can even set up app pairs in the Edge Panel for your favorite set of apps that you use together. Tappin on an app pair will open the two apps simultaneously in split-screen view making it easier for you to multitask.

Edge Panels on Samsung One UI Edge Panels on Samsung One UI Edge Panels on Samsung One UI Edge Panels on Samsung One UI Edge Panels on Samsung One UI Edge Panels on Samsung One UI Edge Panels on Samsung One UI Edge Panels on Samsung One UI

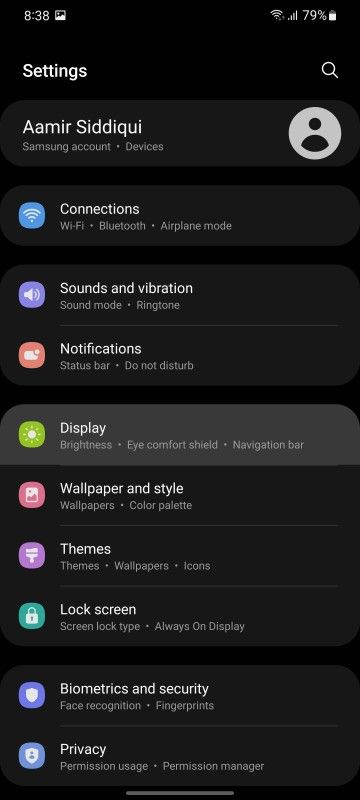
To activate and use Edge Panel, head over to Settings > Display > Edge Screen and enable the toggle next to Edge Panels. You can now tap on the small portion of the screen on the edge to activate Edge Panel on top of any app that you’re in. From here, you can also customize the Edge Panel to include all the features and options that are important to you. Note that Edge Panel is only available on certain Samsung phones and not on all devices.

9. Extend Battery Life with Power Saving Modes

Most smartphones these days come with good battery life and last throughout the day if not longer. However, you may face certain situations where you would want to extend the battery life of your Samsung Galaxy phone further. If you know you’re going to be away from the charger for a long time, you might want to save up some juice for emergency situations. That’s where the various power-saving modes on One UI come into the picture.

Samsung phones come with three different battery modes — Normal, Mid power-saving, and Max power-saving. Depending on the situation, you can switch between these modes.

The Normal mode is for when you want your phone to perform the best with all the available features. It makes the best use of all the resources and enables the fastest performance. Essentially, this is the mode with Power Saving Off or disabled. For regular use, this is the mode your phone should be on at all times.

Battery Saver on One UI 4.0

On One UI 4.0, Samsung has made a few changes to the battery saver. Instead of various modes, they have included a single option with a toggle to disable other functionalities that may not be vital during a battery emergency. To access the battery saver on a phone with One UI 4.0, head over to Settings > Device care > Battery > Power saving.

Here, you’ll find a master toggle to enable power saving mode. This will enable a moderate or mid-level power-saving where all your apps and services will be available to use. You will also be able to connect to the internet and connect to other wireless peripherals. Your CPU performance, however, will be throttled to save some extra power and all background activities will be paused. Other aspects like display brightness and refresh rate will also be reduced.

Samsung Settings Device care Battery settings Power saver on Samsung

If you want the ultimate power saving mode to kick in, you will have to toggle the Limit apps and Home screen option in this menu. This is essentially the MAX power saver that was present in One UI 3.0 and below. You can read the description below to know what the Max power saver does but, in short, it limits your phone to the absolute basic functionality which is making/receiving calls, sending text messages, etc. It even replaces your homescreen with a black wallpaper. This is your last hope when your phone is on the verge of switching off.

Battery Saver on One UI 3.0 and below

Mid Power Saving mode is for when you want to extend your battery life by a bit without affecting the core functionality of your phone. This mode will still let you use all your apps and networks but will limit background usage, tone down your screen refresh rate and resolution, limit display brightness, and disable Always-On display to extend battery life. Use this mode for when you know you’re only a few hours away from a charger so you want your phone to last just an extra bit longer.

Max Power Saving mode is the ultimate rescue tool for when you’re in dire need of battery life and your phone is on its last legs. This mode essentially disables all the functions of your phone that aren’t absolutely necessary and limits it to a set of 8 apps that you can choose from. You can configure apps like dialer, messages, browser, etc. and those will be the only apps you will be able to use when you’re in Max power Saving mode. Things like internet connectivity and Bluetooth will also be limited and your wallpaper will be changed to a black background. If you want to extend your battery life by a big margin and want your phone to stay alive for basic functionality like making and receiving calls, use this mode.

To access the various power-saving modes, head over to Settings > Device Management > Battery and select the desired mode.

10. Customize every single aspect with Good Lock!

I saved the best for the last! Good Lock is an app that can be downloaded via the Galaxy App Store. You can customize every single aspect of your Samsung Galaxy phone with Good Lock. From the notification center to recent apps, the lockscreen to the navigation bar, the app has got it all. First, head over to the Galaxy App Store and download Good Lock on your Samsung phone. Then, open the app to find all the various customization modules that serve different purposes.

Samsung good lock customization Samsung Good Lock

There’s NotiStar for notifications, LockStar for the lockscreen, Multistar for multi-window and multitasking, NavStar for the navigation keys, and a bunch of other customization options that you can use to completely change the way your phone looks! If you have a foldable from Samsung and struggle with the weird aspect ratio in some apps, Good Lock even has a module to change per-app aspect ratios to fit the screen.

The possibilities are endless with Good Lock. I urge you to install the app and spend a good amount of time going through all the various modifications you can make. You surely won’t be disappointed!


So, what are you waiting for? Grab your brand new Samsung Galaxy phone and get to work! Customize the device to make it your own and follow all the simple tricks to get the best out of your device. Which of these tips did you like the best? Let us know in the comments below!

The post First 10 things to do with a new Samsung Galaxy Phone appeared first on xda-developers.


from xda-developers https://ift.tt/3yXZhFu
via IFTTT

OPPO Find N Review: Combining the best of Samsung and Huawei’s foldables

OPPO may be late to the foldable smartphone game — Samsung, Huawei, Xiaomi, Motorola, and even, uh, Royole have already hit the market with foldables. But according to the company’s chief product officer Pete Lau, this late entrance wasn’t due to a lack of ability. OPPO had, in fact, built six foldable prototypes over the past four years — and in a media briefing with Lau, we even caught a glimpse of these devices, which included clamshells, innie-folds, and outer-folds. But ultimately, the company decided to wait until the technology matured.

And with the benefit of hindsight, OPPO could also examine what other companies did right and wrong. And so the company’s first foldable, the Find N, seems to take the best of Samsung’s Galaxy Z Fold 3 and Huawei’s Mate X2 to form one well-balanced package. In fact, this is my new favorite foldable hardware.

OPPO Find N

OPPO Find N Specifications: Click to expand

OPPO Find N: Specifications

Specification OPPO Find N
Build
  • Gorilla Glass Victus front and back
  • Aluminum frame and hinge
Dimensions & Weight
  • Folded: 132.6 x 73 x 15.9 mm
  • Unfolded: 132.6 x 140.2 x 8.0 mm
Display
  • Main
    • 7.1″ flexible OLED with UTG
    • 1792 x 1920
    • 120Hz refresh rate
  • Secondary
    • 5.5″ AMOLED screen
    • 988 x 1972
    • 60Hz refresh rate
    • 18:9 aspect ratio
SoC
  • Qualcomm Snapdragon 888
    • CPU
      • 1x ARM Cortex-X1 @ 2.84GHz
      • 3x ARM Cortex-A78 @ 2.4GHz
      • 4x ARM Cortex-A55 @ 1.8GHz
    • GPU: Adreno 660
RAM & Storage
  • 12GB LPDDR5 RAM + 256GB UFS 3.1 storage
  • 12GB LPDDR5 RAM + 512GB UFS 3.1 storage
Battery & Charging
  • 4,500mAh battery
  • 33W wired fast charging
  • 15W wireless charging
Security
  • Side-mounted fingerprint reader
Rear Cameras
  • Primary: 50 MP, f/1.8, 24mm (wide), 1/1.56″
  • Secondary: 16 MP, f/2.2, 14mm (ultra-wide), 123˚
  • Tertiary: 13 MP,f/2.4, 52mm (telephoto), 1/3.4″
Front Camera
  • 32MP, f/2.4 (main screen)
  • 32MP, f/2.4 (secondary screen)
Port
  • USB Type-C
  • No 3.5mm headphone jack
Audio 
  • Stereo speakers
Connectivity
  • Qualcomm Snapdragon X60 4G LTE and 5G integrated modem
    • 5G: n1/n3/n5/n7/n8/n20/n28/n38/n40/n41/n77/n78/n79
    • 4G: LTE FDD: B1/2/3/4/5/7/8/12/17/20/28/32/66
    • 4G: LTE TDD: B38/40/41/42
    • 3G: WCDMA: B1/2/4/5/8
    • 2G: GSM: 850 900 1800 1900 MHz
  • Dual SIM, Dual 5G standby
  • Bluetooth 5.2
  • Wi-Fi 6E
  • NFC and IR blaster
Software ColorOS 12 based on Android 11

About this hands-on: OPPO provided me with a Find N unit to test. This review is after a week of use. OPPO did not have any inputs in this article.

OPPO Find N Hardware: The Goldilocks foldable

Up until now, foldable phones have been either very small or very large. Clamshell foldables like the Galaxy Z Flip 3 or Motorola Razr are just normal-sized phones that fold in half to become tiny — smaller than even a drink coaster in height and width. Larger foldables like Samsung’s Fold series, Huawei’s Mate X series, or Xiaomi’s Mix Fold, are basically iPad Mini-sized tablets that transform into a modern era flagship slab — which means they’re relatively big even in this form. Samsung and Xiaomi did make their foldables narrower in width, but they’re still tall phones that tower over, say, a standard iPhone.

all three foldables

The Samsung Galaxy Z Fold 2, Huawei Mate X2, and Xiaomi Mix Fold

The OPPO Find N is the first foldable to find a balance between the two approaches. Its outside secondary screen measures just 5.5-inches, with a more conventional 18:9 aspect ratio, and thanks to thin bezels and subtle curvature at the edges, this makes the Find N look and feel ultra-compact in folded form. In fact, it’s significantly smaller than an iPhone 13 Pro, which itself is not big by modern slab standards.

OPPO Find N

The Find N with an iPhone 13 Pro

And it’s noticeably shorter and more compact than the Galaxy Z Fold 3.

Find N and Z Fold 3

Find N and Galaxy Z Fold 3

The OPPO Find N is the first foldable to find a balance between too big and too small

And because the Find N’s screen uses an 18:9 aspect ratio compared to the Galaxy Z Fold 3’s 24.5:9, it can display smartphone content in a more “normal” manner, without the cramped and elongated feeling you get from the Z Fold 3. This is of particular importance when typing — onscreen keyboards have always felt cramped on the outer screens of Samsung’s Fold phones, and even worse on the Xiaomi Mix Fold, which leads to more typos. On the Find N, I can peck away at my usual speeds.

typing on the OPPO Find N

The curvature of both front and back glass, along with a more rounded hinge area also makes for a more comfortable in-hand feel than the Galaxy Z Fold 3, whose hinge corners are still slightly sharp (this problem was even worse on the Galaxy Z Fold 2 before it).

The hinge of the OPPO Find N and Galaxy Z Fold 3

You may notice from the photo above that the Find N also folds completely flat, while the Galaxy Z Fold 3’s folds at an angle and leaves a slight gap. That’s because the Find N’s hinge has a small cavity into which the screen tucks for a less harsh fold than the Galaxy Z Fold 3’s design.

OPPO Find N hinge

This design also means the Find N’s inside screen doesn’t show much of a crease (and it actually has a double crease because of the lenient fold bend). You can spot the double-crease if you look at the screen from extreme angles under certain lighting, but it’s far, far less noticeable than the crease in the Galaxy Z Fold 3.

Find N crease and Fold 3 crease

Find N (left), Galaxy Z Fold 3 (right).

The Find N’s main screen is a 7.1-inch, 1792 x 1920, 120Hz panel, and it looks and feels great. It’s covered by ultra-thin glass so it feels less plasticky than Xiaomi and Huawei’s foldable and more like Samsung’s foldables — the screen, in fact, is sourced from Samsung. And animations are buttery smooth, although quite jarring when jumping back to the mere 60Hz outside screen.

OPPO Find N

In the last week, the Find N has received a lot of gushy praise from tech media for this hinge design that has mostly eliminated the crease and the gap. I have to add some context to that. While this is a damn great design, the Find N is not the first to offer this design. We’ve seen it in Motorola’s Razr foldables, and in more direct comparison, the Huawei Mate X2, too. In terms of look and feel, the Find N’s hinge is very similar to the one seen in the Huawei Mate X2.

But OPPO improves on this hinge by adding a trick pioneered by Samsung: the ability for the hinge to stay open mid-fold at any angle. Samsung calls this “Flex Mode,” OPPO calls its take “FlexForm Mode,” but they work the same way. Right now, only Samsung and OPPO foldables can do this — and it is a very practical feature that further justifies the point of foldables.

The hinge being able to stay halfway folded allows the Find N to be used as a mini laptop, and because the screen aspect ratio is wider than the Galaxy Z Fold 3, the keyboard is less cramped too. I actually can type slightly faster in laptop mode with multiple fingers than just two-thumb typing.

Find N in laptop mode. find n hinge

This form also lets users take photos or videos, or watch media, hands-free. For example, I was able to take this photo of myself in front of a graffiti wall without needing a tripod.

oppo find n flexform mode.

Battery and Memory

The OPPO Find N, despite its compact size, packs a 4,500 mAh battery that is slightly bigger than the 4,400 mAh cell in the Galaxy Z Fold 3. And because the outside screen is just a 60Hz panel and OPPO’s Chinese ROM software has some aggressive battery management (more on this in the software section), the Find N’s battery life has been stellar. In the first two days of use, I would unplug at 9 am, use it heavily all day, and still have around 40% battery 15 hours later by midnight. But this is with OPPO’s overly aggressive battery optimization that has unintended side effects (again, more on this in the software section). After I disabled the aggressive battery micro-management, I still finished 15-hour days with 25% battery left. This phone should be able to go all day for anyone. Topping up can be done via the included 30W fast charging brick or wireless charging.

With 12GB of RAM and at least 256GB of storage (my unit has 512GB), the Find N is as well equipped as many modern flagships. In my week of heavy use I have not experienced app launch stutters or crashes.

Hardware nitpicks

There are some nitpicks to be had with the hardware: the Find N only has two speakers (Samsung, Xiaomi and Huawei’s large screen foldables have four), and they’re both located on the bottom of the Find N, so you are not getting immersive stereo sound. And while the hinge feels very sturdy and well-built, there is no official IP rating like Samsung’s Galaxy Z Fold 3 either. The phone’s Snapdragon 888 SoC will also be officially “last-gen” in a few weeks as flagships with the Snapdragon 8 Gen 1 get announced. Still, considering the Find N’s relatively low price (7699 yuan, which converts to around $1,206), these can’t be called anything but nitpicks.


OPPO Find N: Cameras

There are five cameras on the OPPO Find N: two 32MP selfie cameras (one on each screen), and a triple-camera main system headlined by a 50MP, f/1.8, 1/1.58-inch sensor, along with a 16MP ultra-wide and a 12MP telephoto lens that can do 2x optical zoom. While the main camera is the same one used in the Find X3 so it is quite capable, the latter two lenses are inferior to what was seen in the Find X3, which means, once again, a foldable phone is using a compromised camera system that is not the company’s best optics.

OPPO Find N camera system

The Find N’s triple-lens array consists of a 12MP telephoto (top), 50MP main (middle), and 16MP ultra-wide (bottom)

For the most part, the Find N can still produce great shots — and the camera definitely holds up well against the Galaxy Z Fold 3’s cameras — but for someone like me who’s been spoiled by jaw-dropping, world-beating cameras seen in the Vivo X70 Pro Plus and Google Pixel 6 Pro, I can’t say the Find N camera really wows me. For example, the OPPO Find X3 had an awesome ultra-wide camera that produced shots almost as sharp as the main camera. The Find N can’t do this since the ultra-wide sensor got downgraded, so if you pixel peep, you can clearly see that ultra-wide photos are softer and less detailed, especially at night.

In the below set, we can see the Find N’s main camera blows out the skies a bit compared to the iPhone 13 Pro’s shot. The ultra-wide battle is closer, with the Find N’s shot looking punchier and livelier, but in a scene like this shooting against backlight, some contrast (shadows) may be preferred.

The OPPO Find N’s telephoto zoom lens can capture 2x optical zoom and digital zoom up to 20x. If we stick to 2x, the shot is clean and sharp.

But if we go up to 10x zoom, which is purely digital crop, shots are noticeably not as good as what the Galaxy S21 Ultra or Pixel 6 Pro can do, however, if we compare the Find N against the Z Fold 3, the OPPO foldable’s digital zoom is still a bit better (less noise) than the Galaxy Z Fold 3’s 10x zoom.

The Find N’s main camera does a great job at night thanks to the combination of pixel-binning and relatively large sensor. Colors and dynamic range are on point in both shots below.

Selfies and portrait shots all turn out quite good — overall the Find N’s camera system is very good unless you have been spoiled by the absolute best cameras (again, the Vivo X70 Pro Plus and Google Pixel 6 Pro).


OPPO Find N Software: Awesome gesture and customizations but needs some polish

The Find N runs ColorOS 12 over Android 11, and when the phone is folded up, the software behaves like any other recent OPPO phone, which in my opinion is a great thing — because ColorOS is very similar to OxygenOS, which most would agree is a very smooth and useful Android skin. ColorOS, like OxygenOS, is highly customizable, both in aesthetics and using the phone. We don’t just have the option to change UI color scheme, icon shape and sizes, and animation speeds, but we also have a myriad of shortcut gestures, from a quick launch sidebar that can be pulled into homescreen with a swipe, or screen-off gestures, which allows us to trigger actions or launch apps by scribbling a shape onto a sleeping screen (without needing to wake up the screen). I absolutely love the screen-off gestures and wish other phones would adopt them: I can, for example, turn on the flashlight by drawing a V, or skip music tracks by scribbling an arrow (“>”), all without needing to wake up the screen. OPPO even lets us customize these gestures, so I can, say, launch Google Maps by drawing an M.

Speaking of Google, because the Find N is officially selling only in China, it does not come with Google apps, but these can be installed very easily. OPPO’s own app store has the Google Play Store, so it’s just a matter of downloading and installing.

I absolutely love ColorOS’ screen-off gestures and wish other phones would adopt them.

However, like most China market-only phones, the battery optimization is overly aggressive, to the point that the phone breaks push notifications — meaning you may not be notified when someone sends you a WhatsApp message because the Find N has put WhatsApp to sleep. I can solve this problem by diving into settings and turning off battery optimization for important apps like WhatsApp, Slack, and Gmail, but it is really annoying that we have to do this. Chinese brands — please stop with the aggressive battery optimization! Nobody likes opening a chat app just to realize there are 12 messages sent hours ago waiting to be read. We will gladly sacrifice some battery life to be able to get notifications in time. Seriously, please stop doing this!

So that’s ColorOS when used as a normal slab phone. OPPO has made further changes to the UI for when the Find N is unfolded — in tablet mode. The biggest additions are quick gestures to help multi-task. With any app opened, swipe down the middle with two fingers to activate the split-screen mode. The gesture feels like you’re slicing the screen in half and the animations add to that whimsical feel. You can also pinch with three or four fingers on an app and the app will shrink into a floating window that can then be resized.

Not every app works: Instagram, for example, refuses to be split-screened or float. But 90% of apps I use worked well. And because the Find N’s inside screen has a wider landscape aspect ratio, it can display two apps side-by-side in a more native format than the cramped, narrower Galaxy Z Fold 3 screen. Notice in the photo below, XDA’s homepage is looking very cramped on the Galaxy Z Fold 3’s split-screen.

Find N

Find N (left); Galaxy Z Fold 3 (right).

However, the Find N’s software as a tablet needs more polish. Because the Android tablet scene is so sad, app developers don’t really bother optimizing apps for Android tablets (at least not like they do for the iPad), so one major problem is some apps will open in the wrong orientation. This usually happens with Android tablets in landscape orientation but the app in question only was written to run in portrait orientation. It’s an issue I encountered with tablets from Xiaomi, Huawei and Samsung too.

On the Find N, for example, YouTube Studios and Uber must open sideways — they refuse to fit into the landscape orientation. But Instagram, another app which only opens in portrait orientation, will open upright on the Find N, but with major pillar-boxing.

This problem was also there for Samsung’s first couple of foldables, but it’s mostly non-existent on the Galaxy Z Fold 3. This is partly because the Galaxy Z Fold 3’s main screen, even when unfolded, is in portrait orientation. But it’s also because Samsung has clearly fine-tuned its UI to make sure apps can be rotated in any orientation. Samsung’s Fold UI can also force any app to stretch across the entire screen, which I find very preferable for a visual-heavy app like Instagram. Pillar boxing just takes away from the immersion.

Many third-party apps, from Spotify to Telegram to Gmail, automatically take advantage of the Find N’s larger canvas by showing a two-pane layout.

Overall, considering this is OPPO’s first foldable, the Find N’s software experience can be called good — it just needs a bit more polishing to adapt to the fact that some widely used apps don’t play well with landscape aspect ratio.


OPPO Find N: Conclusion

If we compare the OPPO Find N against competitors, the Find N wins in most cases. The Find N’s screens are clearly superior to the Xiaomi Mix Fold’s screens, which have thicker bezels, slower refresh rates, and a noticeable crease on the inner display. And while the Mix Fold has since gone on discount, if we go by the official retail price, the Find N is cheaper by a thousand-plus yuan or around $200.

If we compare the OPPO Find N against competitors, the Find N wins in most cases

The Huawei Mate X2’s form factor, screen and crease all compete well against the OPPO Find N, and the Mate X2 is still to this day the only foldable to offer a Periscope zoom lens. But its $2,700 price and lack of Google Mobile Services makes this a no contest. You’d have to have no regard for money to want to pay $2,700 over $1,200 for a similar type phone.

Of course, the device most people will compare the Find N against is Samsung’s Galaxy Z Fold 3, and this one is closer. As I already said, I think the Find N’s hardware looks and feels better in-hand than the Galaxy Z Fold 3, but the latter has more polished software. We also can’t discount the fact that the Z Fold 3 has an official IP water resistance rating, stylus support, and Samsung DeX. How important these extra features are depends on the person — I personally have never broken a phone from water damage, and the stylus experience on the Fold is so compromised that my review unit S-Pen Pro has been collecting dust in a drawer somewhere. So the only Fold 3 extra feature I “miss” is Samsung DeX. But your mileage will vary.

oppo find n on a bookshleve

I can say from my usage, I much prefer the Find N’s form factor and aspect ratio. And judging from many of the comments I’ve seen from my peers in tech media and also readers, I think my opinion is shared by many. But ultimately, it’s the price that makes the Find N a winner. For two years, foldable detractors have mocked the price of foldables. Well now OPPO has made a foldable that is not a cent more expensive than a top-tier flagship. I understand that this is China pricing, and if the Find N gets released internationally, the price will surely jump higher. But even if it gets up to $1,500, this is still not far off from a Samsung Ultra or Apple Max phone.

The age of foldables is here

The point is, I think 2022 is the year foldables will finally go mainstream, because if reliable rumors are to be believed, the OPPO Find N is just the beginning. We will get foldables from Honor, Vivo likely soon, and Xiaomi will surely have a follow-up. And since OPPO has set pricing at $1,200, there’s no way Honor and Xiaomi can price their products much higher.

Once multiple brands compete and try to outdo each other, tech breakthroughs happen. Samsung will have no choice but to bring their A-game too. The age of foldables is here.

    OPPO Find N
      The OPPO Find N is a foldable that's neither too big nor too small -- and it has a mostly crease-free screen.

        Pros:

        Cons:

    The post OPPO Find N Review: Combining the best of Samsung and Huawei’s foldables appeared first on xda-developers.


    from xda-developers https://ift.tt/3prXmpT
    via IFTTT