
Windows 11 is almost here. The release date is set for October 5th, and soon many of us will be using the brand-new operating system. Windows 11 is different in many ways from Windows 10, so it’s good to be aware of how things work in this new version. Windows Insiders can already try the many new features available in preview, but for everyone else, we’re here to help. We’re going to be taking a deep dive into many parts of Windows 11, and this article will focus on the new Snipping Tool.
The Snipping Tool in Windows 11 is something of a merger of the classic Snipping Tool with the Snip & Sketch app in Windows 10. It mostly retains the UI elements of the latter but adds some features from the former.
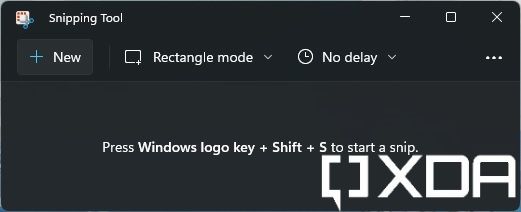
Snipping Tool UI on Windows 11
When you launch the Snipping Tool app on Windows 11, you’re greeted with the window below. This window gives you a handful of options that will be familiar if you use the classic Snipping Tool. You can set a type of snip (fullscreen, rectangle, or freeform), as well as a time delay of 3, 5, or 10 seconds. This is where it’s most apparent that the new app is a merger between the classic Snipping Tool and Snip & Sketch.
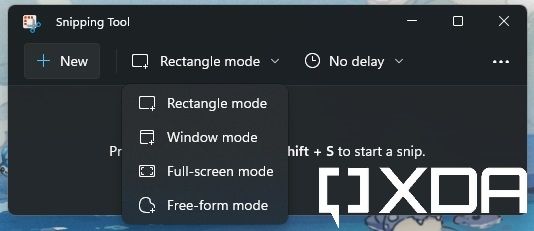
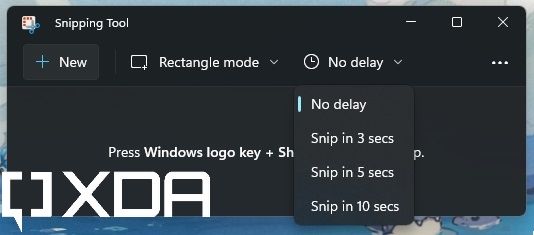
Snip & Sketch had a more modern UI, but lacked some features. You could only set the type of snip after clicking “New”, and the delay options were either 3 or 10 seconds. This brings back more of the options of the classic Snipping Tool but in a modern UI. The old Snip & Sketch UI has also been updated further to now match the Windows 11 design language, so your theme color isn’t as prevalent, some icons have been tweaked, and there are rounded corners everywhere.
Taking and editing snips
Once you start taking a screenshot with the new Snipping Tool, everything will feel exactly like how it did in Windows 10. You can still change the type of snip using the floating toolbar at the top of the screen, and that’s because you can launch the Snipping Tool with a keyboard shortcut (Windows key + Shift + S). You just have the option to change it beforehand, too. After you select an area to take a screenshot of, you’ll get a notification in the bottom right corner of your screen to edit the snip.

Once in the editor, the tools are pretty much the same as before, except the pencil tool from Snip & Sketch has been removed (the classic Snipping Tool also didn’t offer this option). You can draw on your picture using a digital pen or highlighter, which you can change the color of. The color picker now has a translucent background, but otherwise, it’s the same. Some options have been moved around, though. The undo and redo buttons are now in the central section of the toolbar, but there are dividers for different kinds of tools.
The first division includes the drawing tools — pen, highlighter, and eraser — while the second one has the ruler, the cropping, and the finger draw option. On touch-enabled devices, this lets you draw using your finger instead of moving the image around. This is because, usually, you might want to use a pen to draw instead. Finally, the last division has the undo and redo buttons.

Just like the main window, the editing tool also lets you set a timer and the snip mode so you can take a new screenshot. These options are up in the left corner, and on the right corner, everything is the same as before, aside from new icons. You can save, copy, or share the snip. Through the ellipsis menu, you can also print the image, open a file, or choose to open the snip with a different app for further editing.
Settings
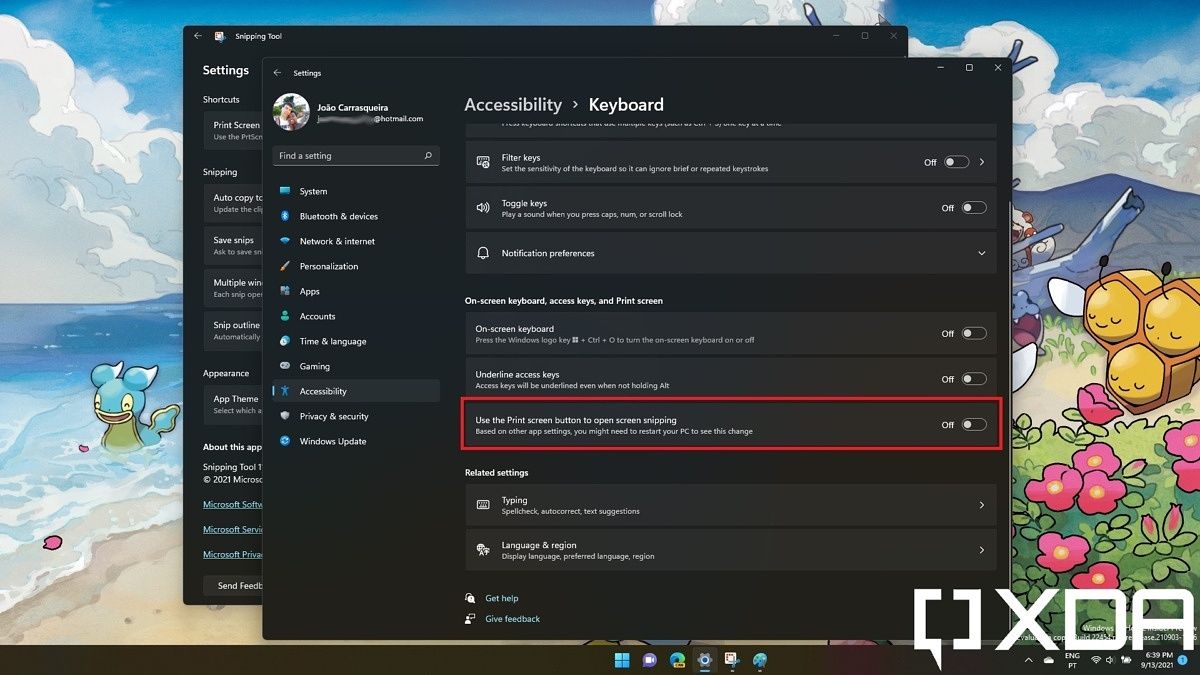
Finally, the app settings are nearly identical to Snip & Sketch on Windows 10. One of the big options here is the ability to set the Snipping Tool to open when you press the Print Screen key. Typically, you can launch Snipping Tool by pressing the Windows key + Shift + S at the same time, and Print Screen simply copies your entire screen to the clipboard. If you enable this feature in the Settings app, you’ll make the Print Screen key behave like the key combination.

Other returning options include automatically copying snips to the clipboard — so you can paste them anywhere without editing them — automatically adding an outline to the snip, opening each snip in a new window, and asking the user if they want to save a snip before closing the window. The only new option here is the ability to set the app’s theme separately from the global Windows theme. That way, you can have a dark theme in Windows and a light theme in the app or vice versa.
That’s about all you need to know about using the Snipping Tool in Windows 11. Unifying the Snip & Sketch and classic Snipping Tool means less confusion for users, and all the options you need are available in one app.
Want to upgrade to Windows 11? Be sure to check out the minimum requirements to make sure you can, or check out our list of every PC that will support the Windows 11 upgrade.
The post Windows 11 deep dive: Checking out the new Snipping Tool appeared first on xda-developers.
from xda-developers https://ift.tt/3nAXCSX
via IFTTT
Aucun commentaire:
Enregistrer un commentaire